Oracle Cloud Database Access with Twingate
Securely connect to Oracle Database and other OCI-managed databases using Twingate
Oracle Database can run on-premises, in Oracle Cloud Infrastructure (OCI), or in other public clouds. OCI also offers managed services such as Autonomous Database, MySQL HeatWave, and NoSQL Database.
Best practice across all of these is to avoid public endpoints and restrict inbound access to trusted networks only.
Twingate routes database traffic through secure Connectors, letting you enforce private endpoints and firewall rules without exposing your databases to the internet.
- OCI-managed Databases: Securing Access
- Oracle Database: Securing Databases
- Optional: Securing OCI Console Access
Prerequisites
- Remote Network & Connector – Create a Remote Network in Twingate and deploy one or more Connectors:
- For private endpoints, place Connectors inside the same VCN (OCI) or LAN as the database and use their private IP addresses in firewall or listener rules.
- For public endpoints, capture each Connector’s public IP address to allowlist in firewall or
sqlnet.ora.
- Database instance – An Oracle Database (default port 1521), Autonomous Database, MySQL HeatWave, or other supported OCI database service.
Tip: Use Private Endpoints for Private Connectivity
If you are running Oracle Database in OCI or other clouds, use Private Endpoints or deploy the database with only a private IP address:
- Your Connector connects to a private endpoint inside your VCN/VPC.
- All traffic stays on Oracle’s internal network fabric, bypassing the public internet entirely. This same approach works with other cloud providers.
- No need to allowlist Connector public IP addresses — access is automatically restricted to your private network.
See Oracle’s docs on Private Endpoints in OCI for setup steps.
OCI-managed Databases: Securing Access
For Autonomous Databases / MySQL HeatWave / NoSQL Databases
- Private Endpoint (recommended): Deploy the database with a private endpoint inside your VCN and add it as a Twingate Resource.
- Public Endpoint (fallback): If you must use a public endpoint, restrict access to Connector public IP addresses using OCI Network Security Groups or firewall rules.
Step 1 – Create a Twingate Resource
-
In the Twingate Admin Console, add a Resource for your Oracle Database host:
- Use the database’s private IP address or FQDN when possible.
-
Assign access to user groups.
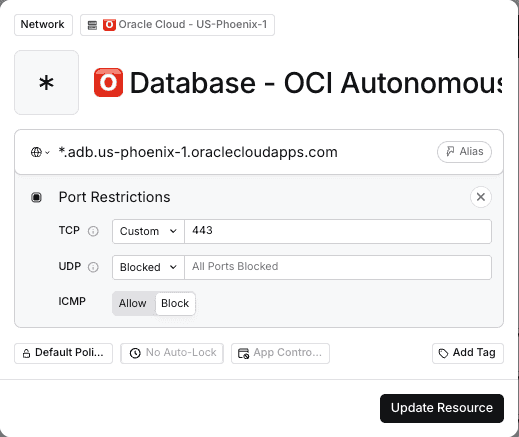
Twingate Resource for Autonomous Database

Step 2 – Configure network restrictions
-
Firewall / Security List – Allow traffic from Connector private IP addresses or VCN.
-
Set the access control list to the Virtual Cloud Network (VCN) and the private subnet CIDR so it allows traffic originating from the Connectors.
-
Use Connector public IP addresses only if the Connector must traverse the internet.
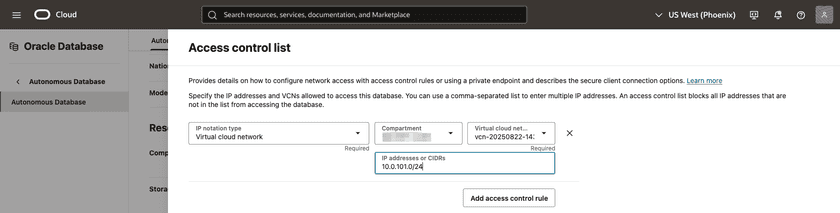
Oracle Autonomous Access Control List

Step 3 – Connect to Oracle
-
Download the wallet for database authentication
-
Unzip and change
DIRECTORYofsqlnet.orato the absolute path of the wallet...METHOD_DATA = (DIRECTORY="/Users/<User>/Downloads/Wallet") -
Set the
TNS_ADMINenvironment variable sosqlplusknows where to find the walletexport TNS_ADMIN=/Users/<User>/Downloads/Wallet -
Grab a TNS name from
tnsnames.orato authenticate againstexport TNS_NAME=nw0xyz123_high -
Connect to Autonomous DB over Twingate
sqlplus username/password@TNS_NAME...SQL> SELECT * FROM ADMIN.EMPLOYEES ORDER BY EMP_ID;EMP_ID FIRST_NAME LAST_NAME SALARY-------------- --------------------- ------------------- ----------1 Charlie Brown Finance 750002 Alice Smith HR 600003 Bob Johnson Engineering 850004 Charlie Brown Finance 75000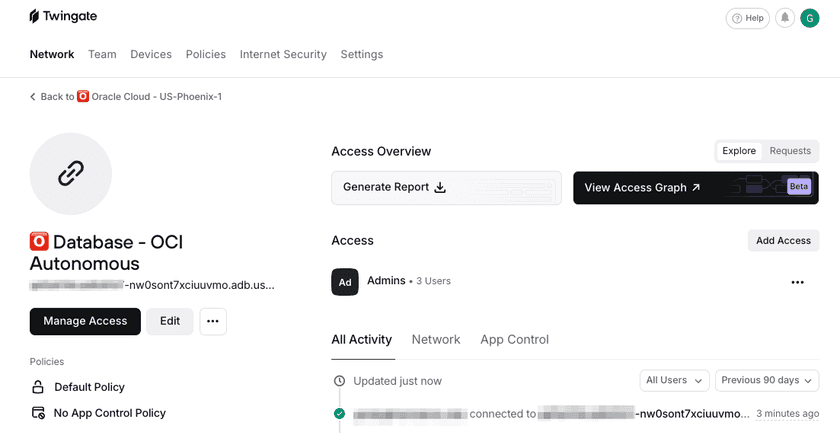
Successful Connection in Twingate

Oracle Database: Securing Databases
For self-managed Oracle Database (on OCI VMs, Exadata, other clouds, or on-prem):
Step 1 – Create a Twingate Resource
- In the Twingate Admin Console, add a Resource for your Oracle Database host:
- Use the database’s private IP address or FQDN when possible.
- Port:
1521(default) or the port defined inlistener.ora.
- Assign access to user groups.

Step 2 – Configure network restrictions
- Firewall / Security List – Allow traffic on the DB port only from Connector private IP addresses.
- Set the access control list to the Virtual Cloud Network (VCN) and the private subnet CIDR so it allows traffic originating from the Connectors.
- Use Connector public IP addresses only if the Connector must traverse the internet.
Step 3 – Configure listener restrictions (optional but recommended)
Oracle’s sqlnet.ora supports Valid Node Checking:
tcp.validnode_checking = YEStcp.invited_nodes = (1.2.3.4, 1.2.3.5) # Connector Public/Private IP AddressesAdd your Connector IP addresses and reload the listener:
lsnrctl reloadStep 4 – Connect to Oracle
# SQL*Plussqlplus username/password@"//twindemodb.privatesubneta2.xyz.oraclevcn.com:1521/orclpdb"Optional: Securing OCI Console Access
Restricting access to the OCI Console (cloud.oracle.com) can help protect database management operations.
OCI does not have a native console IP allow list, but you can gate access with Twingate through SSO.
Tip: Combine with SSO for Identity-based Control
If your organization uses SSO (Okta, Azure AD, etc.), you can also gate cloud.oracle.com behind SaaS App Gating for identity-based control.
Troubleshooting Database Connections
If you’re having trouble connecting to your database via Twingate, check the following common issues:
-
Connection refused: Verify that the Connector’s IP address is allowed in your firewall or
sqlnet.orafile. Invalid or missingtcp.invited_nodesentries will cause Oracle to reject the connection. -
Listener restart required: Changes to
sqlnet.oratypically require a listener reload (lsnrctl reload) to take effect. -
Port mismatch: Ensure your Twingate Resource uses the correct port (default 1521). Some Oracle configurations use different ports
-
Slow Connections: Check the health of your Connectors and make sure there are no firewall rules blocking access to the database.
-
Timeouts: Verify your Connectors are online, reachable, and properly configured.
-
Twingate Recent Activity: In the Admin Console, open Recent Activity for the Resource to see what’s happening:
-
DNS Failed: The Client sent traffic to the Connector, but the Connector couldn’t resolve the hostname. Ensure the DNS hosted zone is tied to the VPC, the DNS server is defined as a Twingate Resource (if self-hosting), or there’s a valid route from the Connector to the DNS server.
-
Connection Failed: The Client captured the traffic, sent it to the Connector, and the Connector tried but couldn’t reach the destination. Check that a route exists between the Connector and database, IP allow lists are correct, and firewall/security group rules allow the port on both ends.
-
No Activity: The Client didn’t send traffic to the Connector. Make sure the Client is running, you have access to the Resource, and no other VPN is hijacking the connection.
-
For more troubleshooting tips, refer to the Twingate Troubleshooting Guide.
Related Resources
- AWS Database Access Guide Secure access to AWS-managed databases.
- Azure Database Access Guide Secure access to Azure-managed databases.
- GCP Database Access Guide Secure access to GCP-managed databases.
- SaaS App Gating Guide Gate access to SaaS applications with identity-based controls.
- Connector Best Practices Learn best practices for deploying and managing Twingate Connectors.
- Security Policies Guide Understand and implement security policies with Twingate.
Last updated 2 months ago