Google Cloud SQL Access with Twingate
Securely connect to Cloud SQL (MySQL, PostgreSQL, SQL Server) using Twingate
Google Cloud Database Access with Twingate
Google Cloud offers multiple managed databases, including Cloud SQL, AlloyDB, Memorystore, Spanner, Bigtable, and Firestore. Best practice is to keep these services on private networks and restrict inbound access to trusted networks only.
Twingate routes database traffic through secure Connectors, letting you enforce IP address or private endpoint restrictions without exposing your database publicly.
- GCP: Securing Databases with Private IP or PSC
- GCP: Securing Databases with Public IP (Authorized Networks)
- Optional: Securing GCP Admin Console Access
Prerequisites
- Remote Network & Connector – Create a Remote Network in Twingate and deploy one or more Connectors:
- For private endpoints, place Connectors inside the same VPC as the database and use their private IP addresses in firewall rules.
- For public endpoints, capture each Connector’s public IP address to add to Authorized Networks.
- Database deployment – A Cloud SQL instance, AlloyDB cluster, Memorystore instance, or other GCP database.
Tip: Use Private Service Connect for Private Connectivity
For the best security and performance, use Private Service Connect (PSC) or Private Service Access (PSA) to connect to your database:
- Your Connector connects to a private endpoint inside your VPC.
- All traffic stays on Google’s internal network fabric, bypassing the public internet entirely.
- No need to allowlist Connector public IP addresses — access is automatically restricted to your private network.
See Google’s docs on Private Service Connect for setup steps.
GCP: Securing Databases with Private IP Address or PSC
Private IP address and PSC are the most secure connection methods.
These require your Connector to be deployed in the same VPC (or a peered VPC) as your database.
Step 1 – Enable Private IP Address or PSC for your database
Cloud SQL / AlloyDB

- In the Google Cloud Console, go to:
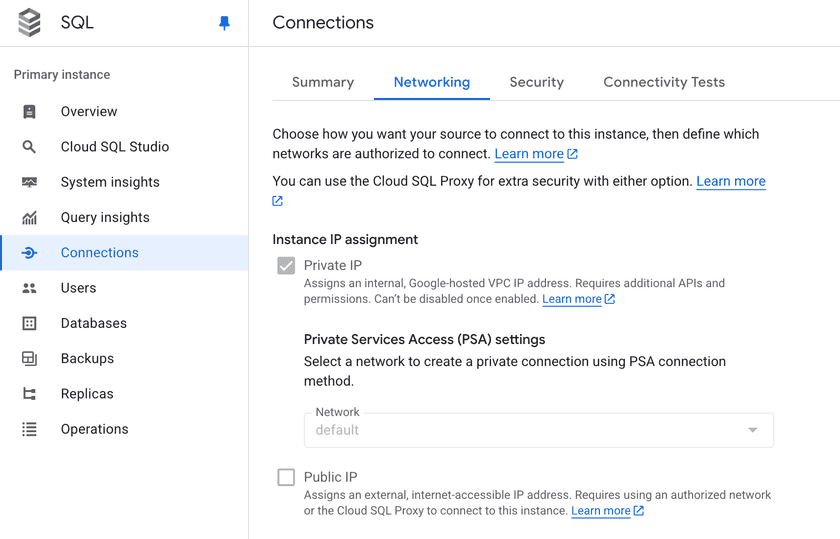
- Cloud SQL → Instance → Connections tab → Networking
- AlloyDB → Cluster → Networking
- Enable Private IP and choose your VPC.
- Remove Public IP if not needed.
Memorystore (Redis / Memcached)
- Only accessible via internal IP address. Configure VPC Network Peering when creating the instance.
API-only services (e.g. BigQuery, Spanner)
- Create a PSC endpoint inside your VPC.
Step 2 – Create a Twingate Resource for the private endpoint

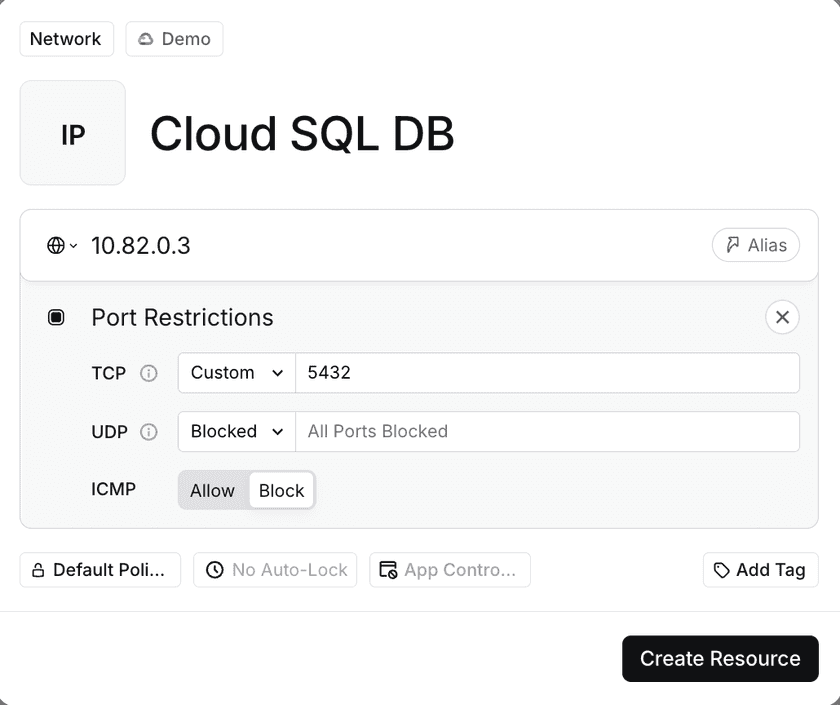
- In the Twingate Admin Console, create a Resource using the private IP address or private DNS name of your database.
- Set the port based on the database type:
- MySQL:
3306 - PostgreSQL:
5432 - SQL Server:
1433 - Redis (Memorystore):
6379
- MySQL:
- Assign access to the relevant user group(s).
Step 3 – Connect to your database
With the Twingate Client running, connect using your database client:
# MySQLmysql -h <private-ip> -u <username> -p# SQL Serversqlcmd -S <private-ip> -U <username> -P <password> -d <database># PostgreSQLpsql -h <private-ip> -U <username> -d <database># Example with PostgreSQLpsql -h 10.82.0.3 -U postgres -d postgresPassword for user postgres:psql (17.6, server 17.5)SSL connection (protocol: TLSv1.3, cipher: TLS_AES_256_GCM_SHA384, compression: off, ALPN: postgresql)Type "help" for help.
postgres=> SELECT * FROM sample_table; id | name | age | city----+---------+-----+------------- 1 | Alice | 30 | New York 2 | Bob | 25 | Los Angeles 3 | Charlie | 35 | Chicago 4 | David | 28 | Houston 5 | Eve | 32 | Phoenix(5 rows)
postgres=>GCP: Securing Databases with Public IP Addresses (Authorized Networks)
Use this method only if private connectivity isn’t possible.
Authorized Networks allow you to whitelist specific IP addresses for public access to Cloud SQL or AlloyDB. Twingate lets you keep this list minimal by adding only your Connector’s IP addresses.
Step 1 – Create a Twingate Resource for the public endpoint
- In the Twingate Admin Console, create a Resource for your database’s public IP address or FQDN.
- Set the port based on your database type (see above).
Step 2 – Add Connector IP Addresses to Authorized Networks
-
In the Google Cloud Console, go to:
- Cloud SQL → Instance → Connections tab → Authorized networks
- AlloyDB → Cluster → Networking → Authorized networks
-
Click Add network and enter the public IP address of each Connector (in
/32CIDR format). -
Save changes — only these IP addresses will be allowed.
Step 3 – Connect to your database
With Twingate running, connect using your database client. Connections will only work when they originate from the Connector’s IP addresses in your Authorized Networks.
Optional: Securing GCP Admin Console Access
Restricting access to the Google Cloud Console (console.cloud.google.com) can be important for sensitive projects.
While GCP does not have a built-in IP allow list for the console, you can gate access with Twingate through SSO.
Tip: Combine with SSO for Identity-based Control
If your organization uses SSO (Google Workspace, Okta, Azure AD, etc.), you can gate console.cloud.google.com behind SaaS App Gating for identity-based control.
Troubleshooting Database Connections
If you’re having trouble connecting to your database via Twingate, check the following common issues:
-
Connection denied: Verify that the Connector’s IP addresses are listed in the authorized networks. Remember that Cloud SQL denies all incoming connections unless specifically authorized.
-
Proxy issues: Ensure the Cloud SQL Auth Proxy is running and has the correct IAM credentials. The instance connection name must match the instance you are connecting to.
-
Port mismatch: Make sure the port you specify in the Twingate Resource matches the database engine’s port.
-
Slow Connections: Check the health of your Connectors and make sure there are no firewall rules blocking access to the database.
-
Timeouts: Verify your Connectors are online, reachable, and properly configured.
-
Twingate Recent Activity: In the Admin Console, open Recent Activity for the Resource to see what’s happening:
-
DNS Failed: The Client sent traffic to the Connector, but the Connector couldn’t resolve the hostname. Ensure the DNS hosted zone is tied to the VPC, the DNS server is defined as a Twingate Resource (if self-hosting), or there’s a valid route from the Connector to the DNS server.
-
Connection Failed: The Client captured the traffic, sent it to the Connector, and the Connector tried but couldn’t reach the destination. Check that a route exists between the Connector and database, IP allow lists are correct, and firewall/security group rules allow the port on both ends.
-
No Activity: The Client didn’t send traffic to the Connector. Make sure the Client is running, you have access to the Resource, and no other VPN is hijacking the connection.
-
For more troubleshooting tips, refer to the Twingate Troubleshooting Guide.
Related Resources
Last updated 2 months ago