How to Configure SaaS App Gating with OneLogin
How to configure OneLogin and Twingate to protect access to SaaS applications
Twingate Admin Console Prerequisites
-
Add your IdP’s authentication FQDN as a Resource. As this use case is dependent on an IP address associated with one or more Twingate Connectors, the first step is to create a Twingate Resource associated with your organization’s OneLogin tenant URL (e.g.,
tenant.onelogin.com) and associating that Resource with one or more Groups. Doing this means that authorized users attempting to authenticate through OneLogin will be coming from the exit IP address associated with the Twingate Remote network used to enable connectivity to the new Resource. This is the IP address you’ll use as part of the OneLogin App Policy configuration. -
Apply a Device-only Policy to Your IdP Resource. A Device-only Resource Policy, when applied to the IdP Resource (e.g.,
tenant.onelogin.com), allows users to route traffic through the Connector to access the IdP login portal without authentication dependencies that can create access loops. This policy prevents the common “chicken-or-egg” scenario, where users can’t authenticate with the IdP because network access to the IdP portal requires prior authentication via Twingate. By allowing users to reach the IdP through a Device-only policy, they can meet sign-on requirements without encountering this authentication loop.
Creating a OneLogin App Policy
In the OneLogin admin console, navigate to Security → Policies and select New App Policy.

App Policy Configuration
At the App Policy configuration screen, name your App Policy (in this case, we’ve named it Twingate SaaS App Gate). You’ll also see a box to the right titled Allowed IP Addresses. In that field, you’ll insert the public exit IP address for the Remote network where your Connectors are deployed.

Applying the Twingate App Gating Policy
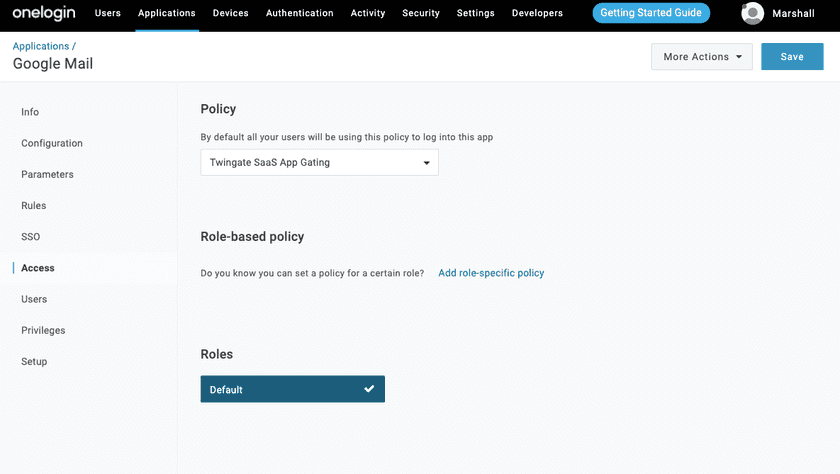
Within the OneLogin admin console, navigate to Applications → Applications and select the app you’d like to apply the OneLogin App Policy to (e.g. Google Workspace).

Go to Access → Policies and select your App Policy (in this case, we’ve used “Twingate SaaS App Gating”, then hit save in the upper right corner of the console.

This rule ensures that attempts to access the app in question will only be allowed if the user is connected to Twingate with an authorized account that belongs to the correct Twingate Group.
Last updated 1 year ago