How to Deploy a Connector on a Firewalla Box
Install a Connector on a Firewalla Box via Docker to enable remote access to your network
The Twingate Connector can easily be deployed using Docker on Firewalla boxes. This works with boxes that include native Docker container support (Firewalla Gold, Purple, and Blue Plus).
Whether you are using Firewalla for your business or your homelab, admins need a secure means to remotely access both the Firewalla boxes and networks. Traditional VPNs typically provide a gateway with an exposed port (typically port 22), where only authorized users can gain access. The challenge with an exposed inbound port is that it poses an inherent risk that requires contant vigilance to secure, such as through software security updates and patches. Twingate reduces this exposure risk by eliminating the need for open inbound ports and allowing VPN access to be behind the firewall.
Router mode
Note that this configuration is currently based on Router mode and has only been tested on Router mode.
Peer-to-peer connections help you to provide a better experience for your users and to stay within the Fair Use Policy for bandwidth consumption. Learn how to support peer-to-peer connections.
Prerequisites
- Ensure that you are running the latest version of Firewalla on your box.
- Ensure that the Firewalla box is hooked up according to the Router mode configuration guides and confirm that there is outbound internet access available.
- Have a basic Twingate configuration ready for accessing your infrastructure/homelab (Users, Groups, Remote Networks, Resources, etc.). See our Quick Start guide to get you jump-started.
Installing a Twingate Connector on a Firewalla Box
-
From your local network where the Firewalla box is running, SSH into your Firewalla box.
# From your local terminal windowssh pi@<firewalla-ip> -
Ensure that Docker is enabled on your Firewalla box.
# In the existing SSH session, run the following command:sudo systemctl status docker# Output:● docker.service - Docker Application Container EngineLoaded: loaded (/lib/systemd/system/docker.service; disabled; vendor preset: enabled)Active: active (running) since Wed 2024-01-24 17:24:39 MST; 2 weeks 4 days agoTriggeredBy: ● docker.socketDocs: https://docs.docker.comMain PID: 1130 (dockerd)Tasks: 15Memory: 121.5MCPU: 1h 7min 19.547sCGroup: /system.slice/docker.service└─1130 /usr/bin/dockerd -H fd:// --containerd=/run/containerd/containerd.sockNotice: journal has been rotated since unit was started, output may be incomplete. -
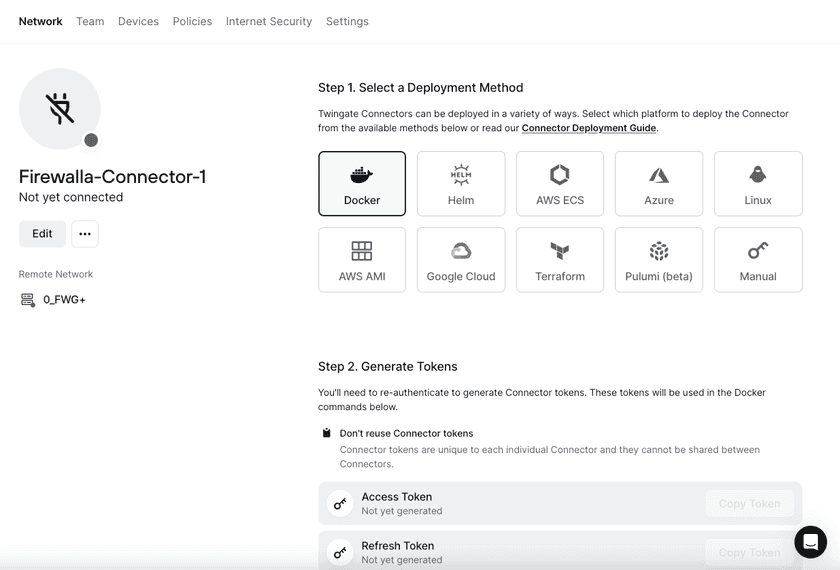
Proceed through the Connector deployment page in the Twingate Admin Console. (Remote Networks -> Remote Network of Choice -> Select/Add a Connector)

Connector deployment page in Twingate Admin Console. -
Walk through the Connector deployment steps:
-
Step 1. Select a Deployment Method:
- Select “Docker”
-
Step 2. Generate Tokens:
- Select “Generate Tokens” and authenticate yourself again to generate
-
Step 3. Customize Docker Command:
- Custom DNS Server (Optional) → Skip this if you are a first-time user. For more advanced users, this can be used if you have a local DNS server that you would like to use for local resolution of FQDNs.
- Make Connector available on local network (Optional) → Enable. This will run the container in host network mode, which is a requirement for the container to access LANs/VLANs your Firewalla box has access to.
- Local network connection logs (Optional) → Enable. This is for troubleshooting purposes and for ingesting in a SIEM (advanced).
-
Step 4. Run Docker Command:
- Copy and paste the command into your SSH terminal and let it run
-
Step 5. Wait for Connection:
- If all goes well, the Connector will have reached out to the Controller to authenticate itself and the setup page in the Twingate Admin Console will change to show the Connector is now active.
- If you hit a snag, take a look at the Connector Best Practices page to ensure you have the right outbound connectivity in place. Our recommendation is to not set restrictions around connectivity until you have verified that it can connect first.
# Check status of running Connector containers (in existing SSH session):sudo docker ps# Output:CONTAINER ID IMAGE COMMAND CREATED STATUS PORTS NAMES1bXXXXXXXXXX twingate/connector:1 "/connectord" 2 months ago Up 3 days (healthy) twingate-fwg-conn2d8XXXXXXXXXX twingate/connector:1 "/connectord" 2 months ago Up 3 days (healthy) twingate-fwg-conn1
-
-
Now go grab some ☕ and access your network remotely through Twingate!
By default, Docker and the Twingate Connector container may not start automatically after a system reboot. To enable this, you can configure your Firewalla device to run a script after reboot that starts your Docker containers. For more information, refer to Firewalla’s official documentation: Customized Scripting
Curious what else you can do?
- Site-to-Site: If you have multiple boxes that need to connect to each other, take a look at Site-to-Site with Twingate.
- Local direct connect: Set up your network segmentation into various VLANs/LANs based on your requirements and use Twingate in your local network to access the various isolated subnets with Auth/MFA requirements.
Last updated 1 year ago