Best Practices for Security Policies
Let's review the types of Policies available, what they mean, and the scope they cover.
Twingate allows administrators to define granular Security Policies to control access to Resources and the Admin Console.
Types of Security Policies
| Type | Description | Scope | Component |
|---|---|---|---|
| Admin Console Security Policy | Gates access to the Twingate Admin Console | Twingate Users with access to the Admin Console | Admin Console only |
| Minimum Authentication Requirements | Gates access to the Twingate environment, does not grant access to Resources | All users connecting to the Twingate environment | Client |
| Resource Policy | Gates access to Resources | Users when accessing Resources | Client |
Admin Console Security Policy
This policy is set under the Settings page of the Admin Console and only applies to Twingate users with either Admin, DevOps or Support role assigned. It is only enforced when accessing the Admin Console. Our recommended best practice for configuring this policy is the following:
- Authenticate every 1 hour (this cannot be changed for security reasons)
- Enforce Multi-Factor Authentication
- Assign the Admin role to at least 2 separate Twingate Users (to prevent getting locked out of the Admin Console in case of sudden departures, for instance)
Minimum Authentication Requirements
This policy is visible under the Policies tab in the Admin Console. It applies to all Twingate users regardless of what Group(s) they belong to. It is enforced when any Twingate user connects to their Twingate Client.
It is important to note that the Minimum Authentication Requirements do not grant access to any Resource unless it is behind a Resource Policy for which the Authentication Requirements have been disabled. Our recommended best practice for configuring this policy is the following:
- Keep it lengthy (e.g. 31 days)
- Don’t enforce Multi-Factor Authentication (leverage MFA via Resource Policies instead)
Defining Policies
A Resource Policy is, as its name suggests, assigned to a Resource and applies to all users who are permitted to access the Resource. It is enforced when a Twingate user is connected to their Twingate Client and attempts to access a Twingate Resource.
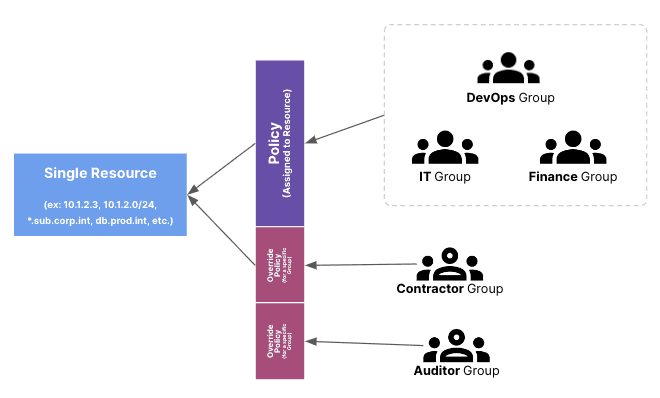
A Resource Policy is designed to answer four questions:
- Does the user need to authenticate to gain access to a Resource?
- What attributes does the device attempting to connect to a Resource need to possess? (For instance, should the device be trusted in advance?)
- Does a user need to provide multi-factor authentication to gain access to a Resource?
- How often does a user need to re-authenticate after they access a Resource?
Designing Resource Policies
We encourage Twingate admins to design their Resource Policies by:
- Cataloging Resources and the level of risk associated with each,
- Mapping risk levels to policy definitions,
- Applying exceptions based on role-based risks.
Cataloging Resources
Let’s first look at the types of public and private Resources you want to protect behind Twingate in conjunction with how you measure risk for your business.
The definition of risk for assets is usually measured against several dimensions, but the dimensions you consider and their relative impact will on your own business constraints and priorities. As an example, some of our customers have chosen to factor in the following dimensions when thinking of risk:
- the data types handled by a given asset (for example, PII vs. non PII, confidential intellectual property, etc.)
- the data volume (how much data can be reviewed when accessing the asset, for instance 1 record at a time via a UI vs. full database access)
- the business impact of data modifications (for example a change to Terraform code for production can potentially have more impact than a change in a SIEM configuration)
- the method of access (UI, CLI, RDP, ssh, etc.)
A common approach is to quantify these risks along a numerical scale and create a risk score for each asset. Once you have performed this risk assessment, think of mapping risk scores to specific policy definitions. In our example, we will use the following simple logic:
High Risk: Users must re-authenticate once every 2 hours, must be required to provide MFA and musty access the Resource from a verified device.
Medium risk: Users must re-authenticate once a day, must be required to provide MFA and must access the resource from a verified device.
Low risk: Users must re-authenticate once a week, must be required to provide MFA and musty access the resource from a verified device.
Very Low risk: Users must re-authenticate once a week, do not need to provide MFA and must access the resource from a verified device.
| Asset | Groups with Access | Risk Score (based on business specific factors) | Re-authentication Frequency | MFA | Device Verification |
|---|---|---|---|---|---|
| Fileshare server | Finance | Medium | once a day | Yes | Always required |
| Source Code repository | Engineering | High | every 2 hours | Yes | Always required |
| Non-production infrastructure | Engineering, IT | Medium | once a day | Yes | Always required |
| Production infrastructure | IT | High | every 2 hours | Yes | Always required |
| Internal Support system | IT | Medium | once a day | Yes | Always required |
| POS system | Retail, Contractors 1 | Very Low | once a week | No | Always required |
| Synthetic data repo | Engineering, Contractors 2 | Low | once a week | Yes | Always required |
| Active Directory / Domain Controllers (Admin) | IT | High | every 2 hours | Yes | Always required |
| Identity Provider (Admin) | IT | High | every 2 hours | Yes | Always required |
| Identity Provider (non-admin)* | Everyone | Very Low | No Auth | No | Always required |
| Active Directory / Domain Controllers (non-admin)* | Everyone | Very Low | No auth | No | Always required |
The bottom two assets are not typical assets: they represent traffic that supports actual assets and are required to be intercepted by Twingate (typically the Identity Provider traffic and Active Directory / LDAP traffic for Windows environments). This is why they should be mapped to the “Everyone” group and require no authentication – authentication requirements should be specified in Policies attached to typical assets (Resources). For more information, see the “Everyone Group” section at the end of this guide.
Device Verification
A device is considered verified if it has passed an automated EDR or MDM integration (such as CrowdStrike, SentinelOne, Kandji, Jamf, etc.) or was manually marked as verified in the Twingate Admin Console.
Device verification often depends on what type of workers make up the workforce of an organization. For instance, it is common to roll out an EDR/MDM to all employee devices but much less common to do the same on the devices used by contractors.
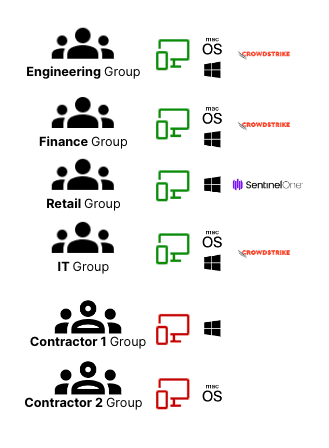
Let’s take the time to look at some examples of the types of devices our users typically use to connect to Resources, including what constraints we can and want to put on those:
| Group | Device OS allowed | Device Verification |
|---|---|---|
| Finance | Company approved macOS or Windows | via CrowdStrike |
| Engineering | Company approved macOS or Windows | via CrowdStrike |
| Retail | Company approved Windows | via SentinelOne |
| IT | Company approved macOS or Windows | via CrowdStrike |
| Contractors 1 | BYOD Windows | Twingate verification via Serial Number (No EDR available) |
| Contractors 2 | BYOD macOS | None, device verification not required (Assets protected through authentication and MFA) |
Now that we have a mapping of which Groups can be required to fulfill device verification and MFA, let’s tie it back to our list of assets, factoring in any exceptions:
| Asset | Groups with Access | Device Verification | Exceptions to device verification requirements for specific Groups |
|---|---|---|---|
| Fileshare server | Finance | Required | None |
| Source Code repository | Engineering | Required | None |
| Non-prod infrastructure | Engineering, IT | Required | None |
| Prod infrastructure | IT | Required | None |
| Internal Support system | IT | Required | None |
| POS | Retail, Contractors 1 | Required | None |
| Synthetic data repo | Engineering, Contractors 2 | Required | Contractors 2 (device verification not available for this Group) |
| Active Directory / Domain Controllers (Admin) | IT | Required | None |
| Identity Provider (Admin) | IT | Required | None |
| Identity Provider (non-admin) | Everyone | Required | None |
| Active Directory / Domain Controllers (non-admin) | Everyone | Required | None |
Configuring Trusted Profiles & Minimum OS Requirements
Devices that do not require verification
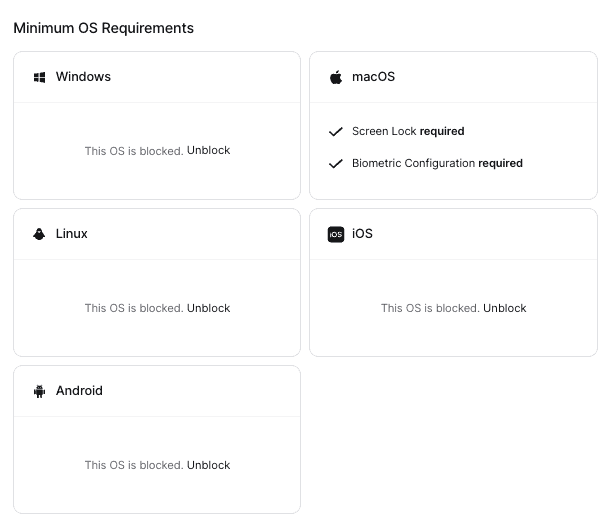
Almost all users need to be on company devices that are verified via either CrowdStrike or SentinelOne. However, for “Contractors 2”, verification via EDR/MDM or via Twingate itself are not an option. Because we only want to do native posture checks for these users, we will need to allow a path for macOS devices without verification to connect. As this is only true for macOS, we can block the other operating systems:

A valid refinement at this point is to ask whether it is still reasonable for us to require “Contractors 2” for certain device posture checks. We could, for instance, require Screen Lock and Biometric Configuration for macOS users:
Devices that require verification
There are 3 “device verification providers” in our context: CrowdStrike, SentinelOne and Twingate itself (for “Contractors 1”).
Let’s start by configuring CrowdStrike and SentinelOne in the Admin Console under Device Settings.
Once done, here is what we will need to create under “Trusted Profiles”:
- a Trusted Profile for macOS requiring CrowdStrike
- a Trusted Profile for Windows requiring CrowdStrike
- a Trusted Profile for Windows requiring SentinelOne
- a Trusted Profile for Windows requiring manual verification
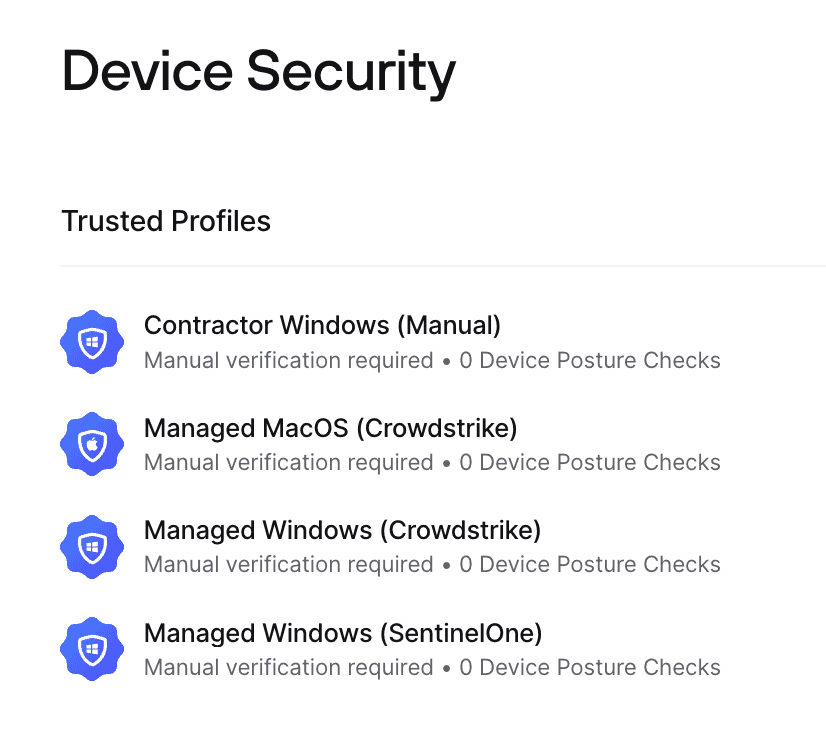
You can select more than one Verification Requirement in a single Trusted Profile, but if you do so, both will be required for a Device to be trusted through it.
Device Trust
Device Trust goes a bit beyond device verification (covered above): a device is considered trusted if it meets the requirements of a Trusted Profile which is made up of one or more verification methods (automated EDR/MDM integration or manual verification) as well as additional posture checks.
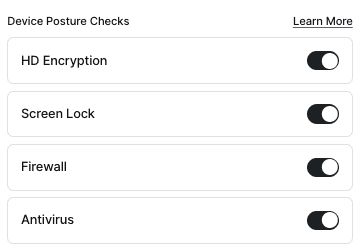
Now that we have our two Trusted Profiles, we should determine if additional posture checks should also be added to those. For instance, on Windows, we could require none, several or all of the following:
- HD Encryption
- Screen Lock
- Firewall
- Antivirus
If we want to enforce all four, we should simply select them within the Trusted Profile for Windows:
Creating Policies
Let’s now map Resource Policies to assets based on the information gathered so far. Let’s use a meaningful naming convention for our policy names to make things more readable once we have all the policies in place:
<Re-auth>-<MFA requirements>-<device verification requirements>
Re-auth: (D = day, H = hour)
MFA requirements: (MFA = MFA is required, NoMFA = MFA is not required)
Device verification requirements: (Verif = device verification is required, NoVerif = device verification is not required)
Let’s also consider existing exceptions and potential additional exceptions based on application permissions:
For instance, we cannot verify devices from the “Contractors 2” group (existing exception).
Additionally, and after further review, IT staff should be required to provide MFA and re-authenticate more often to the POS system (because they have greater access to it than members of the “Retail” group) (additional exception).
| Asset | Primary Policy | Groups with Access | Policy Exceptions |
|---|---|---|---|
| Fileshare server | 1D-MFA-Verif | Finance | None |
| Source Code repository | 2H-MFA-Verif | Engineering | None |
| Non-production infrastructure | 1D-MFA-Verif | Engineering, IT | None |
| Production infrastructure | 2H-MFA-Verif | IT | None |
| Internal Support system | 1D-MFA-Verif | IT | None |
| POS | 1W-NoMFA-Verif | Retail, Contractors 1, IT | “IT” required to provide MFA and re-authenticate every 1 day. |
| Synthetic data repo | 1W-MFA-Verif | Engineering, Contractors 2 | “Contractors 2” cannot be required to provide device verification |
| Active Directory / Domain Controllers (Admin) | 2H-MFA-Verif | IT | None |
| Identity Provider (Admin) | 2H-MFA-Verif | IT | None |
| Identity Provider (non-admin) | 1D-NoMFA-None | Everyone | None |
| Active Directory / Domain Controllers (non-admin) | 1D-NoMFA-Verif | Everyone | None |
Removing the assets and primary policy duplicates, it boils down to just the following 6 policies:
1D-MFA-Verif
2H-MFA-Verif
1W-NoMFA-Verif
1W-MFA-Verif
1D-NoMFA-Verif
1D-NoMFA-None
Now, looking at all exceptions, let’s see what additional policies we will need:
For “IT” access to “POS”, we will need the following policy: 1D-MFA-Verif. Fortunately, this policy will already be created as part of our primary policies listed above.
For “Contractors 2” access to the “synthetic data repo”, we will need a new policy that does not exist in the list of primary policies: 1D-MFA-None.
Great! Let’s now create all of our defined policies in Twingate based on the following definitions:
| Policy Name | Authenticate every | MFA | Device Security |
|---|---|---|---|
| 1D-MFA-Verif | 1 day | MFA required | Only Trusted Devices |
| 2H-MFA-Verif | 2 hours | MFA required | Only Trusted Devices |
| 7D-NoMFA-Verif | 7 days | MFA not required | Only Trusted Devices |
| 7D-MFA-Verif | 7 days | MFA required | Only Trusted Devices |
| 1D-NoMFA-Verif | 1 day | MFA not required | Only Trusted Devices |
| 1D-NoMFA-None | 1 day | MFA not required | Any Device |
| 1D-MFA-None | 1 day | MFA required | Any Device |
Putting it all together
We should now have a complete mapping of:
- Resource assignments to Groups
- Primary policy for each Resource
- Override Policies (per Group) for each Resource
| Asset / Resource | Primary Policy | Groups Primary Policy | Group based policy Exceptions |
|---|---|---|---|
| Fileshare server | 1D-MFA-Verif | Finance | None |
| Source Code repository | 2H-MFA-Verif | Engineering | None |
| Non-production infrastructure | 1D-MFA-Verif | Engineering, IT | None |
| Production infrastructure | 2H-MFA-Verif | IT | None |
| Internal Support system | 1D-MFA-Verif | IT | None |
| POS | 1W-NoMFA-Verif | Retail, Contractors 1, IT | “IT”:1D-MFA-Verif |
| Synthetic data repo | 1W-MFA-Verif | Engineering, Contractors 2 | “Contractors 2”:1D-MFA-None |
| Active Directory / Domain Controllers (non-admin) | 1D-NoMFA-Verif | Everyone | None |
| Active Directory / Domain Controllers (Admin) | 2H-MFA-Verif | IT | None |
| Identity Provider (non-admin) | 1D-NoMFA-None | Everyone | None |
| Identity Provider (Admin) | 2H-MFA-Verif | IT | None |
We can now configure all Resources, Policies and overrides in Twingate!
The “Everyone” Group
The “Everyone” Group is the only Group in Twingate that exists by default and cannot be deleted. It contains all Twingate users. Our recommended best practices regarding the Everything Group are the following:
Resource assignment for the “Everyone” Group
- add a Resource for your IdP (ex:
.okta.com) - [Windows environments only] add Resources for your Active Directory & Domain Controllers (see our Active Directory guide)
Resource Policy for the “Everyone” Group
- Does not require authentication (this is important if you actively use Domain Controllers as it will allow the Twingate Client to access your Domain Controllers before user logon)
- Requires device trust (either native or via EDR/MDM)
Last updated 1 year ago