Deploying the macOS and iOS Clients with Jamf
Configuring Jamf to distribute the Twingate Client
macOS
To distribute the Twingate macOS Client with Jamf, you will need to deploy Twingate as a package. Follow Jamf’s official documentation to configure and distribute Twingate. To deploy a package, you’ll need to upload a PKG to Jamf. You can download the latest Twingate .pkg installer from our download page.
iOS
To distribute the Twingate iOS Client with Jamf, you will first need to add the Twingate Client app to Apple Business Manager. If you haven’t already, link Jamf to Apple Business Manager by following the steps in Jamf’s official documentation.
Once Jamf is linked to Apple Business Manager, you should be able to distribute the Twingate iOS app from Jamf.
Tips
Remove manually installed Twingate Clients
If any end users manually installed the Twingate Client on their device prior to implementing Client distribution with Jamf, you should uninstall those Clients first. If you do not do so, those end users may run into issues like their installed Twingate Client differing from your distributed version.
To remove manually installed Clients, set up a temporary policy defined specifically to remove the Twingate Client application from all devices. This policy should be deactivated once you are ready to roll out the Twingate Client via Jamf.
Creating a Jamf Configuration Profile for silent deployments
When deploying the Twingate Client via Jamf, it is recommended to also deploy a Custom Configuration Profile to enable or disable features of the Client as desired. Below is a step by step example of how to create a Configuration Profile in Jamf that will enable a silent distribution of the Twingate Client. You can find a full list of options in the macOS & iOS page.
-
Login to the Jamf Pro admin console for your organization at
<companyName>.jamfcloud.com. -
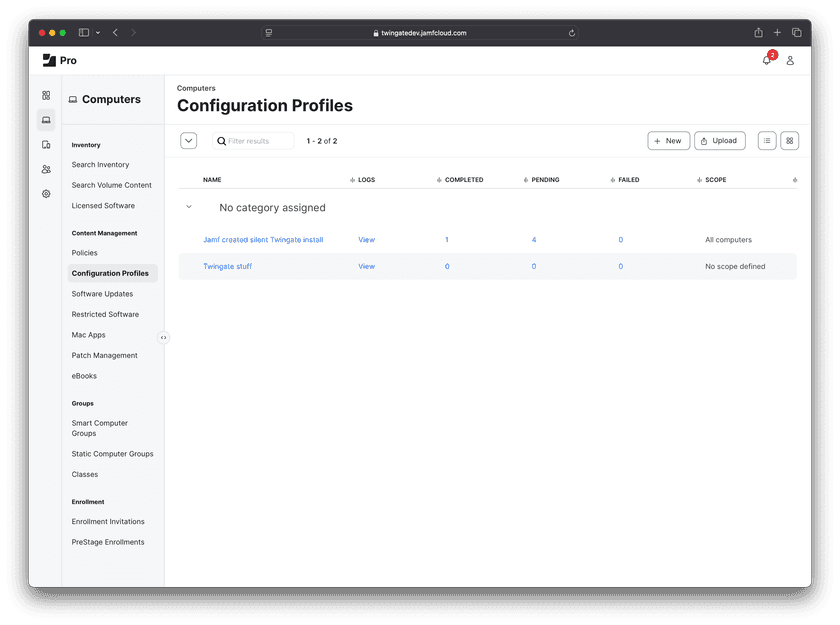
Navigate to Computers in the sidebar, and then Configuration Profiles in the Content Management section.
-
Select the New button at the top-right to create a new configuration profile.
-
Enter a descriptive display name for the profile, such as
Twingate Silent Install.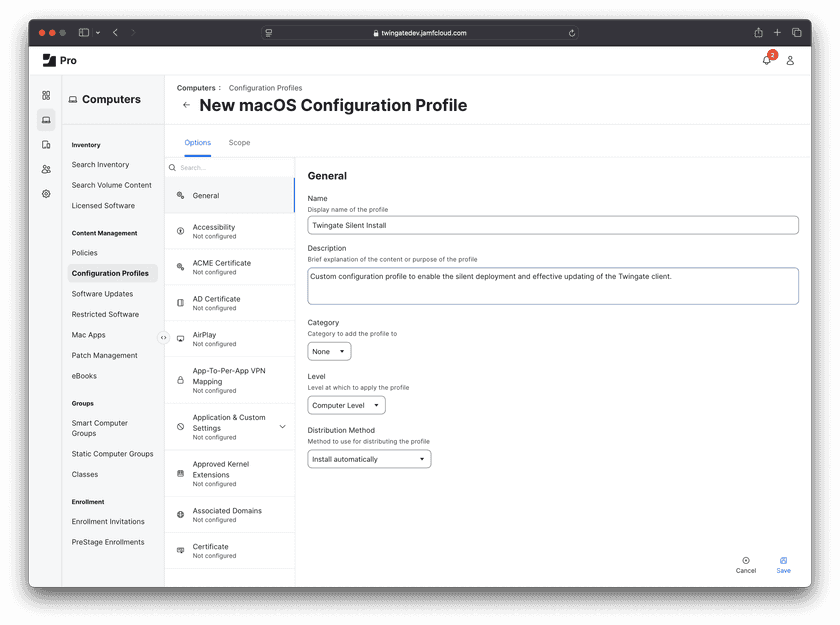
-
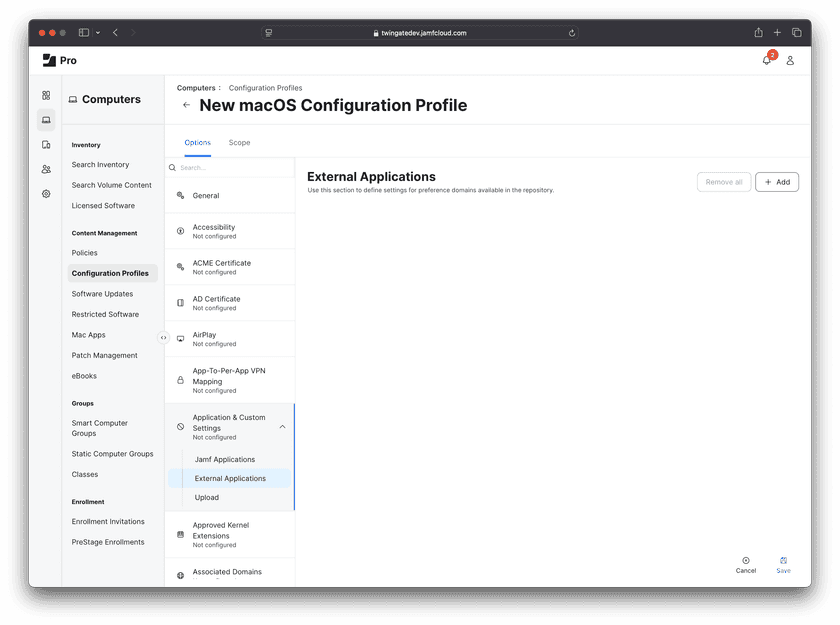
Select Application & Custom Settings, and then choose External Applications in the dropdown that appears.
-
Select the Add button at the top-right to add a new preference domain.
-
Choose Custom Schema as the source to use for the preference domain.
-
Enter the name for the preference domain
com.twingate.macos -
Select Add Schema to provide a JSON schema.

-
Copy the custom JSON schema below and paste it in the modal window as shown, then click save.
{"title": "Twingate (com.twingate.macos)","description": "Preference settings for Twingate","properties": {"PresentedDataPrivacy": {"title": "Suppress Data Privacy Screen","description": "Select true if you wish to bypass the data privacy screen after installation.","property_order": 5,"type": "boolean"},"PresentedEducation": {"title": "Suppress Education Screen","description": "Select true if you wish to bypass the education screen after installation.","property_order": 10,"type": "boolean"},"automaticallyInstallSystemExtension": {"title": "Install System Extension","description": "Select true if you wish to automatically install the system extension during installation.","property_order": 15,"type": "boolean"},"network": {"title": "Define Twingate Network","description": "Enter the name of your Twingate network if you would like it prepopulated when logging in.","property_order": 20,"type": "string"},"LaunchApp": {"title": "Start At Login","description": "Select true if you wish to have Twingate start when a user logs in. Please set to false if deploying with the Twingate Launch Agent","property_order": 25,"type": "boolean"},"SUEnableAutomaticChecks": {"title": "Enable Automatic Update Checks","description": "Select true if you wish to automatically check for updates to the Twingate Client. The user notification after install asking if they would like to automatically check for new updates will not be presented.","property_order": 30,"type": "boolean"},"SUAutomaticallyUpdate": {"title": "Enable Automatic Updates","description": "Select true if you wish to automatically download available updates and be promtped to update.","property_order": 35,"type": "boolean"}}}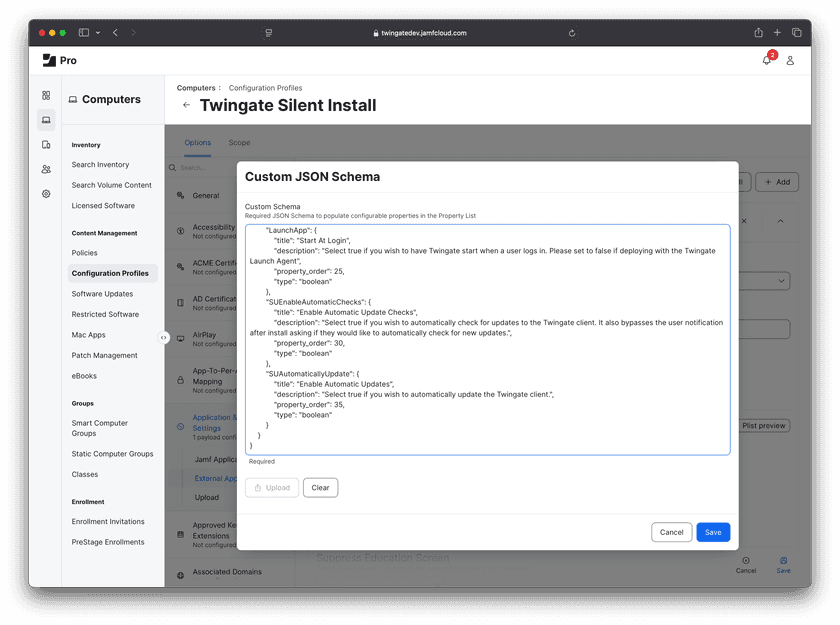
-
After uploading the JSON schema, Jamf Pro will display a user interface to configure the Twingate-specific system policies. Select the following options to enable a fully silent deployment of the Twingate Client:
- Suppress Data Privacy Screen:
true - Suppress Education Screen:
true - Install System Extension:
true - Define Twingate Network:
*Your Twingate network name* - Start At Login:
false - Enable Automatic Update Checks:
false(it is assumed updates will be managed via Jamf) - Enable Automatic Updates:
false(it is assumed updates will be managed via Jamf)
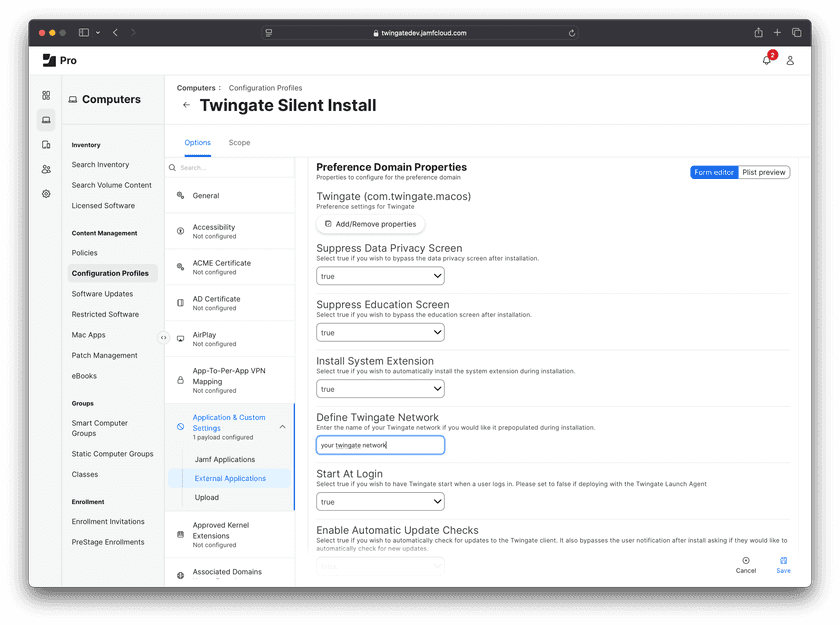
- Suppress Data Privacy Screen:
-
Next, select the option Managed Login Items and enter the Team Identifier
6GX8KVTR9H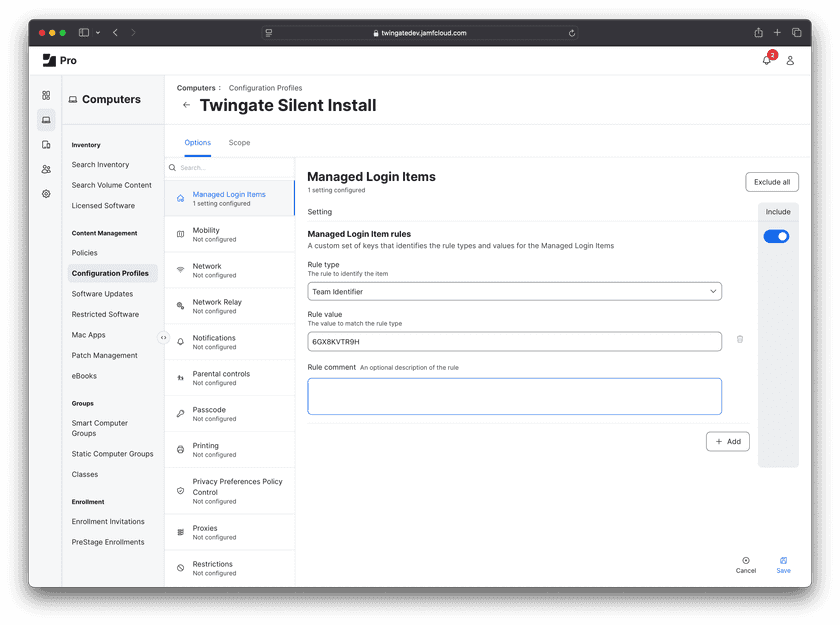
-
Next, select the option Notifications, click Add and enter the following values:
- App Name
Twingate - Bundle ID
com.twingate.macos
Then ensure Notifications are
Enabledas shown below.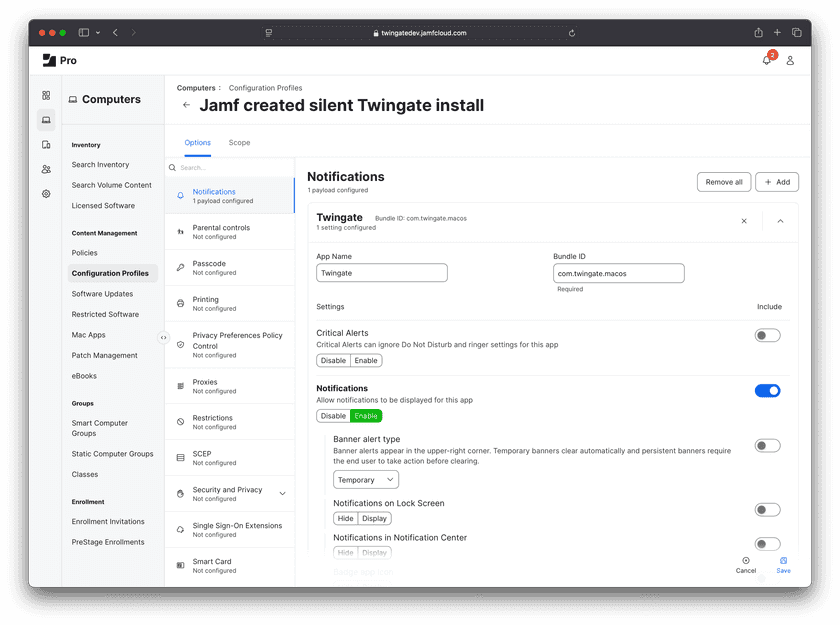
- App Name
-
Next, select the option System Extensions and click the Configure button. In the next window, select or enter the following values:
- System Extension Types
Allowed system extensions - Team Identifier
6GX8KVTR9H
Then underneath ALLOWED SYSTEM EXTENSIONS, click the Add button and enter the value
com.twingate.macos.tunnelprovider. Next, click Save.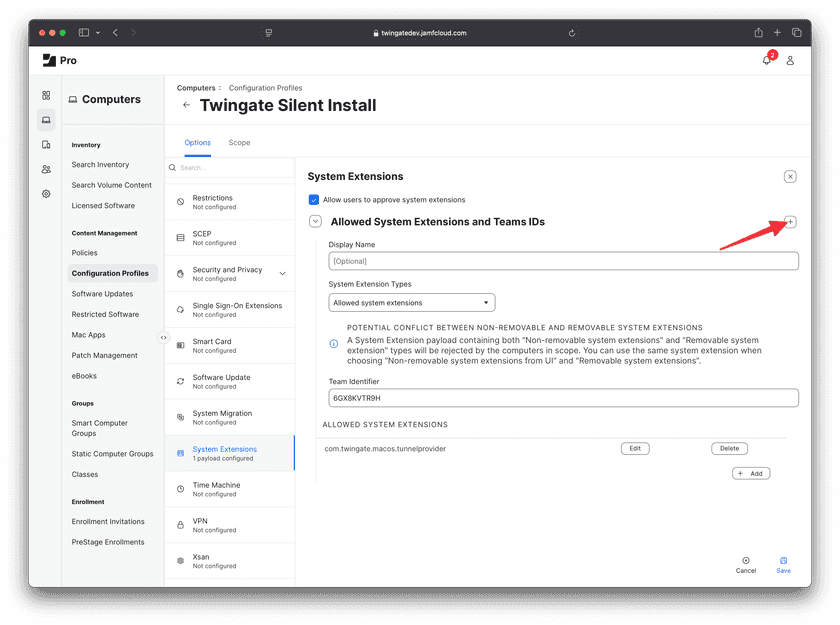
(The following step only applies to macOS fleets that are on version 15 (Sequoia) and above. Please see this explanation as to why. Configuring this setting won’t break earlier versions of macOS - it merely won’t be applied if upgrading to macOS 15 after the fact.)
Click on the + symbol towards the top of the screen (pictured with the arrow pointing to it above), then scroll down and select or enter the following values:
- System Extension Types
Non-removable system extensions from UI - Team Identifier
6GX8KVTR9H
Then underneath NON-REMOVABLE SYSTEM EXTENSIONS FROM UI, click the Add button and enter the value
com.twingate.macos.tunnelproviderthen click Save.
- System Extension Types
-
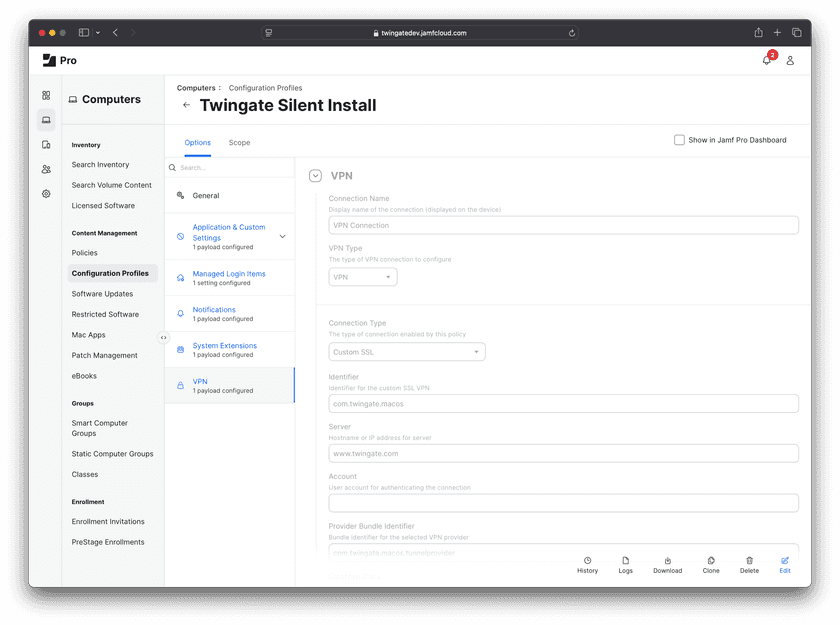
Next, select the option VPN and click the Configure button. In the next window, select or enter the following values (any values not specified below can be left blank or at their default values):
- Connection Name
Twingate - VPN Type
VPN - Connection Type
Custom SSL - Identifier
com.twingate.macos - Server
null(any value will do, it just can’t be left blank as it’s a required field) - Provider Bundle Identifier
com.twingate.macos.tunnelprovider - Provider Designated Requirement
anchor apple generic and identifier "com.twingate.macos.tunnelprovider" and (certificate leaf[field.1.2.840.113635.100.6.1.9] /* exists */ or certificate 1[field.1.2.840.113635.100.6.2.6] /* exists */ and certificate leaf[field.1.2.840.113635.100.6.1.13] /* exists */ and certificate leaf[subject.OU] = "6GX8KVTR9H") - Prohibit users from disabling on-demand VPN settings
tick this optionto enable if desired
Click Save when complete.
- Connection Name
-
Remember to select the deployment scope for your configuration policies in the Scope tab. We recommend scoping to a small test group before deploying to all devices in your organization.
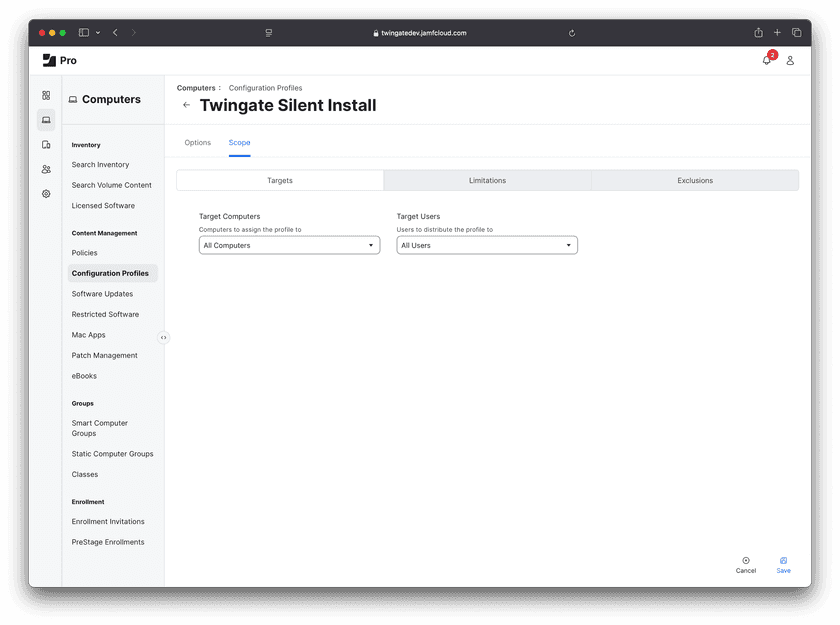
-
Select Save to save the configuration profile. You are now ready to silently deploy the Twingate Client.


Updating the Twingate Client with Jamf
Please note that below is one way of updating the Twingate Client. Please consult with Jamf for alternative methods.
- Download the latest version of the Twingate Client from our website.
- Log into Jamf Pro and upload as a new package. Ensure it has the same priority as the previous package.
- Edit the Jamf policy, removing the old Twingate Client package and adding the new package.
- Test on a device by selecting the policy within Jamf. Then, checking the policy logs, select the device(s) to update and flush the policy on that device.
- The policy will run again according to your policy triggers and update the Client.
Last updated 21 days ago