How-To Guide: Prevent an Elasticsearch Server Breach
Roman Kournjaev
•
•

The Challenge with Securing Elastic
Elasticsearch is a popular search and analytics engine that organizations use for all types of data. Elasticsearch, along with other tools in the “Elastic Stack,‚ such as Kibana and Logstash, are available for free and under a variety of paid subscription plans. However, only the most expensive plans offer the ability to restrict access to users that can authenticate with your company’s identity provider.
This means that if you want to integrate Elastic with an identity provider to enable single sign-on, you will need to pay a steep additional price tag. This is problematic for organizations because Elastic is often used to store and process large volumes of sensitive data. Even though security is, paramount, the additional cost to adequately secure this data may be prohibitive for some organizations.
As a result, many Elastic users rely on “security by obscurity‚, which isn’t “security‚ at all and creates an unacceptable risk for businesses. Last August, an online database operated by a data broker containing personal data of over 230 million users was exposed. While the database’s existence was not publicized, a security researcher discovered it was nonetheless publicly accessible and not password protected. Far from being an isolated incident, unsecured Elasticsearch servers have also resulted in data breaches leaking 1 terabyte of customer data last November and 5 billion records containing personal data in March.
In response, developers have hacked together workaround solutions to put authentication proxies in front of Elasticsearch, but those workarounds are brittle, difficult to setup and maintain, and offer questionable security given the use of shared passwords. Even when the security functionality of Elasticsearch is available, it can be tricky to set up correctly, as one major company discovered when a misconfiguration exposed 6.5 terabytes of search data to the public!
It’s clear that securing Elasticsearch adequately is crucial to preventing server breaches. However, what can you do if you don’t have access to Elastic’s SSO functionality or if you find it’s complicated to configure correctly?
How to Secure Elasticsearch with SSO & MFA using Twingate: Step-by-Step
Twingate is a quick and simple way to add authentication and authorization controls to Elastic (or any other service you want to protect). With Twingate, your identity provider’s SSO functionality can be leveraged without needing to change anything about your Elastic instance. You can also configure user groups which are authorized to access Elastic, and define access policies that, for example, enforce MFA checks on users requesting access to it. By securing your Elasticsearch server with SSO and MFA, you’ll reduce the prospect of a data breach.Check out this page for more details on the benefits of using Twingate for secure remote access.
To get started, first sign up for free account at www.twingate.com. Once you complete the sign up, just follow these steps:
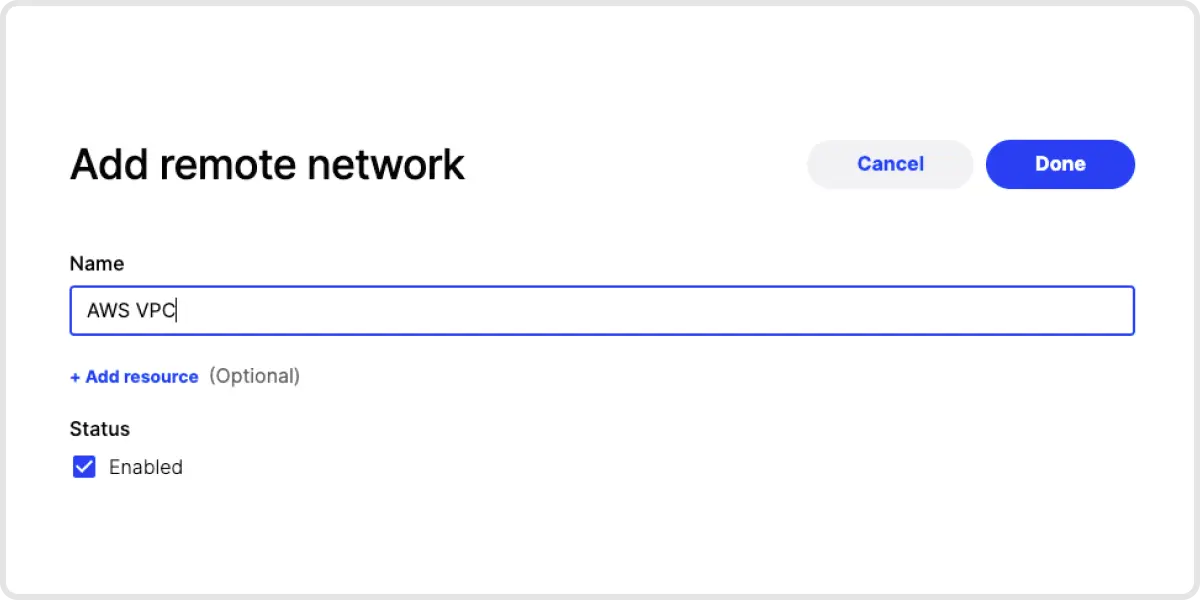
1. Add a Remote Network. Add a Remote Network for the network that your Elastic server is on.
2. Deploy a Connector into that Remote Network. Click on the newly created Remote Network, then add a Connector to that network. You will be asked to authenticate yourself for security purposes. Next, click on Provision and get a command that you can use to deploy a Connector in that network. The Connector doesn’t need to be deployed to the same server on which Elastic is housed - it just needs to be deployed on a device on the same network.
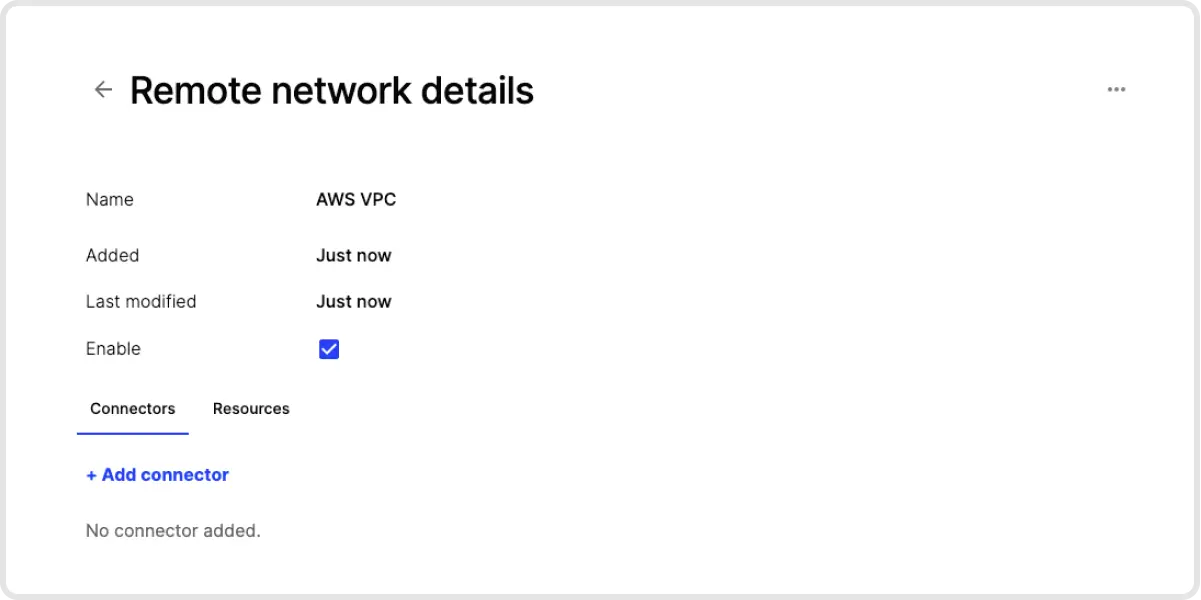

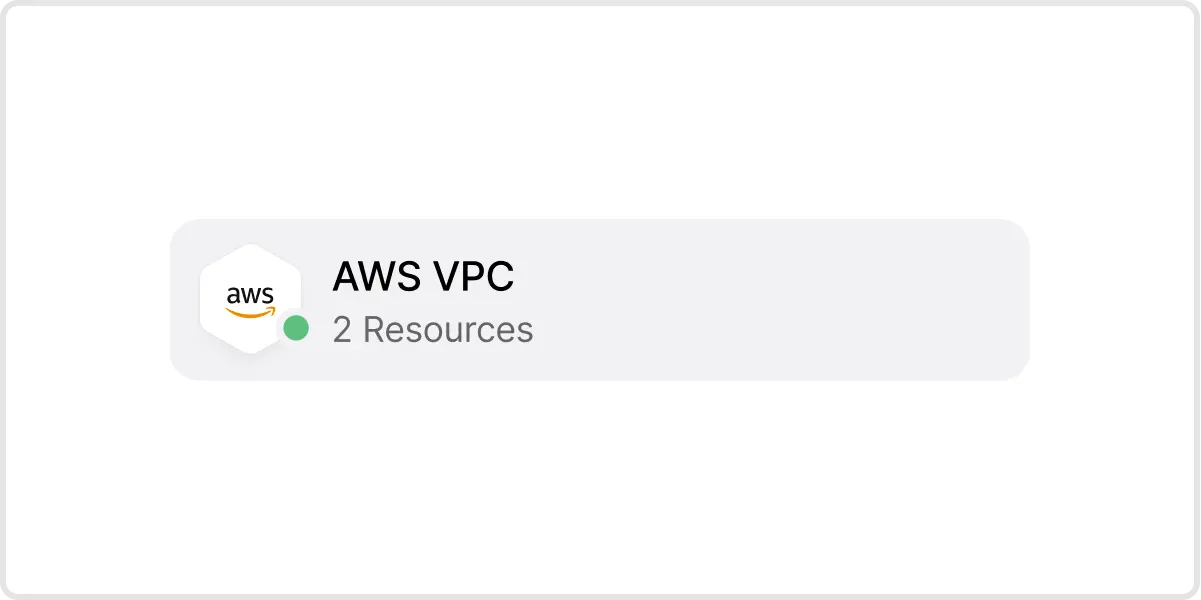
3. Verify Connector Deployment. Once your Connector has been deployed, the icon for that Remote Network will have a green dot, meaning it’s hooked up to Twingate.
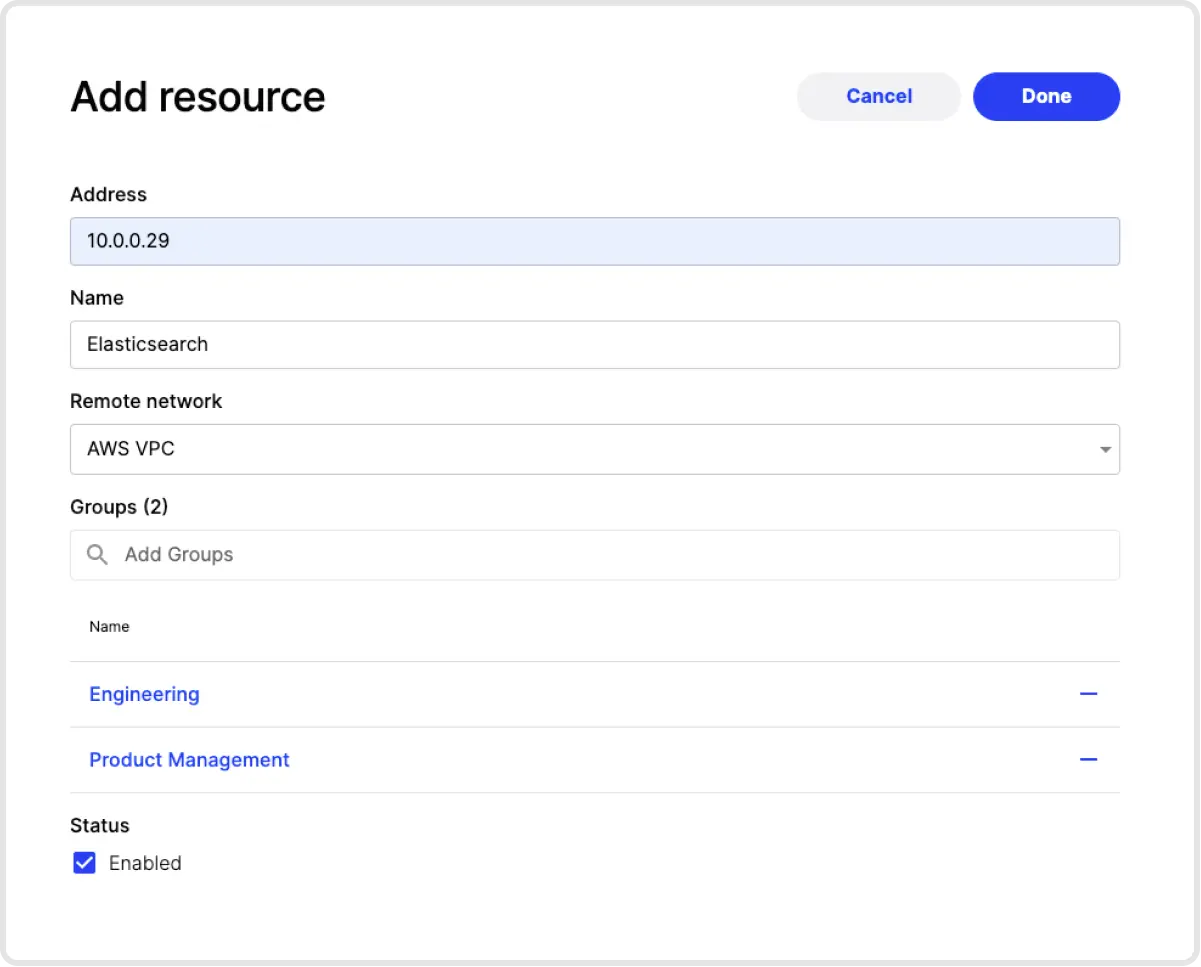
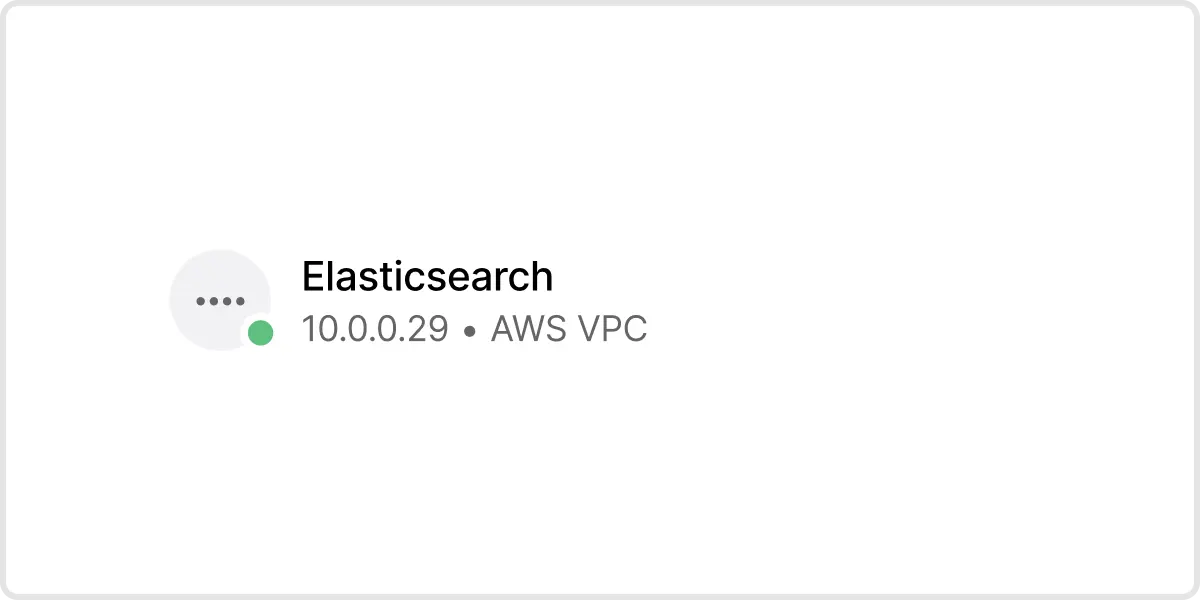
4. Add Elastic as a Resource. The next step is to add a Resource that represents the Elastic server (or servers). You can identify servers by individual IP addresses, a locally resolvable domain name, with CIDR notation or by using wildcards.

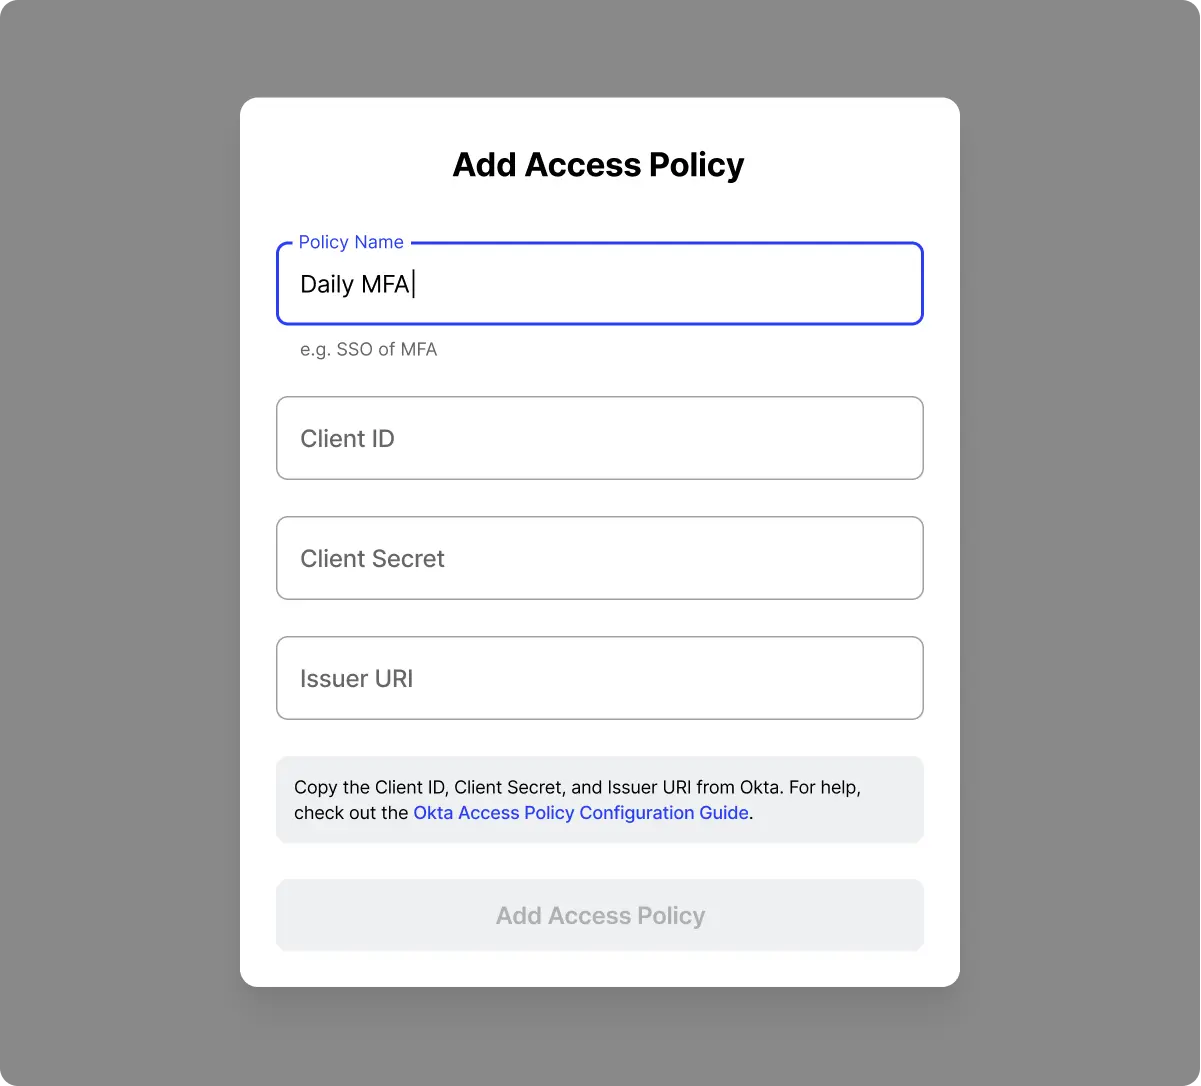
5. Create an Identity Provider MFA Access Policy. Now that we have our Elastic server added to Twingate, we now need to define who has access to that server and under what authentication conditions (e.g. forcing MFA checks for every access, or only once per week). These conditions are referred to as Access Policies. Access Policies are first set up in your identity provider and then tied back to Twingate. See our instructions on how to configure Okta.
6. Add that Access Policy into Twingate. Once you have set up an appropriate Access Policy in your identity provider, you can add an Access Policy into Twingate in the Settings → Identity Provider → Access Policies section.
7. Create a Group and Assign Permissions. Next, go to the Group tab and add a new Group. On this screen you can give your Group a name and associate it with the Access Policy you just created. You can also add user to the Group, and assign which Resources the Group should have access to. In this case, you would add the Elastic server resource created in step 4.
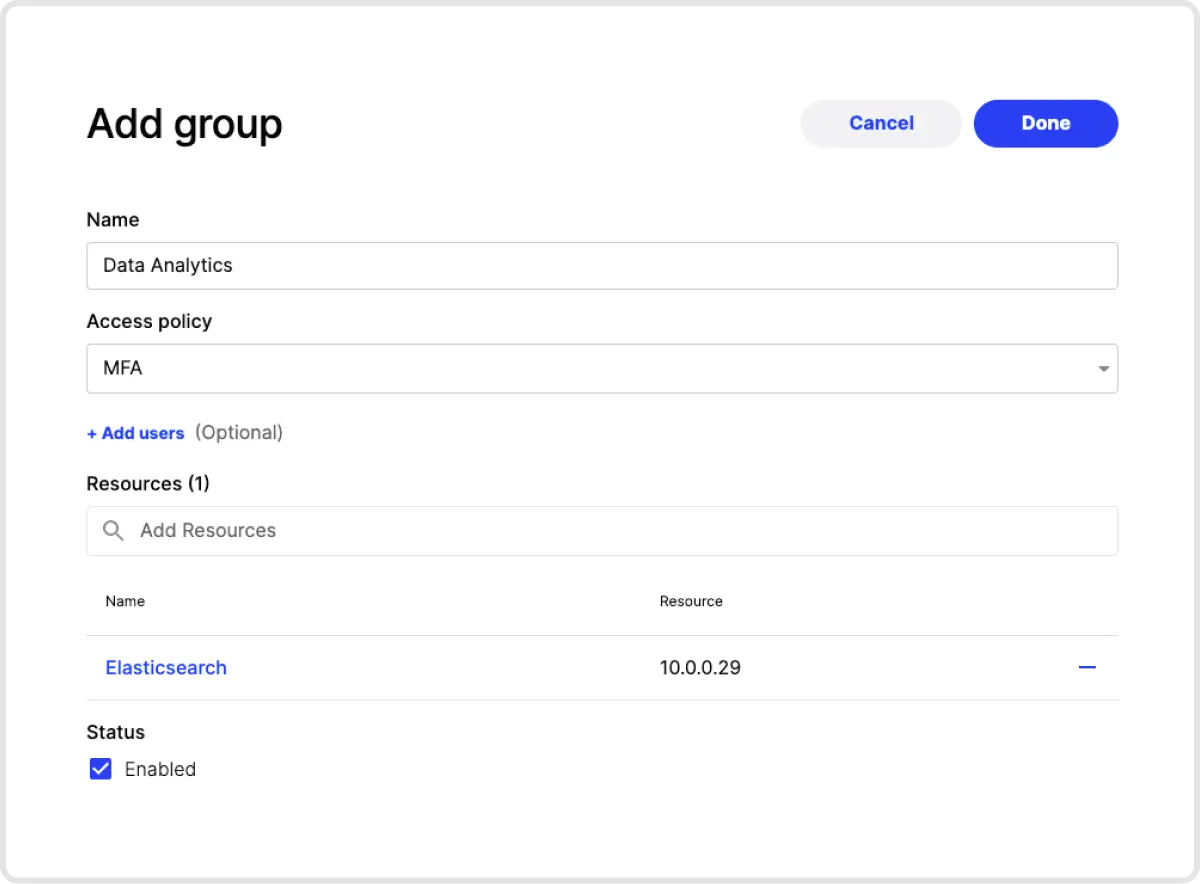
And you’re done! In our example, any user who is part of the Data Analytics group can install the Twingate client, sign in, and then be able to access the Elastic server at 10.0.0.29. When the user attempts to access that IP address, they will be prompted to authenticate using the Access Policy we assigned the Data Analytics group - in our case, MFA. Notice that we didn’t have to touch Elastic at all to secure access to it!
Try It Out
If you want to try it out for yourself, sign up for a free trial of Twingate today!
Rapidly implement a modern Zero Trust network that is more secure and maintainable than VPNs.
How-To Guide: Prevent an Elasticsearch Server Breach
Roman Kournjaev
•
•
The Challenge with Securing Elastic
Elasticsearch is a popular search and analytics engine that organizations use for all types of data. Elasticsearch, along with other tools in the “Elastic Stack,‚ such as Kibana and Logstash, are available for free and under a variety of paid subscription plans. However, only the most expensive plans offer the ability to restrict access to users that can authenticate with your company’s identity provider.
This means that if you want to integrate Elastic with an identity provider to enable single sign-on, you will need to pay a steep additional price tag. This is problematic for organizations because Elastic is often used to store and process large volumes of sensitive data. Even though security is, paramount, the additional cost to adequately secure this data may be prohibitive for some organizations.
As a result, many Elastic users rely on “security by obscurity‚, which isn’t “security‚ at all and creates an unacceptable risk for businesses. Last August, an online database operated by a data broker containing personal data of over 230 million users was exposed. While the database’s existence was not publicized, a security researcher discovered it was nonetheless publicly accessible and not password protected. Far from being an isolated incident, unsecured Elasticsearch servers have also resulted in data breaches leaking 1 terabyte of customer data last November and 5 billion records containing personal data in March.
In response, developers have hacked together workaround solutions to put authentication proxies in front of Elasticsearch, but those workarounds are brittle, difficult to setup and maintain, and offer questionable security given the use of shared passwords. Even when the security functionality of Elasticsearch is available, it can be tricky to set up correctly, as one major company discovered when a misconfiguration exposed 6.5 terabytes of search data to the public!
It’s clear that securing Elasticsearch adequately is crucial to preventing server breaches. However, what can you do if you don’t have access to Elastic’s SSO functionality or if you find it’s complicated to configure correctly?
How to Secure Elasticsearch with SSO & MFA using Twingate: Step-by-Step
Twingate is a quick and simple way to add authentication and authorization controls to Elastic (or any other service you want to protect). With Twingate, your identity provider’s SSO functionality can be leveraged without needing to change anything about your Elastic instance. You can also configure user groups which are authorized to access Elastic, and define access policies that, for example, enforce MFA checks on users requesting access to it. By securing your Elasticsearch server with SSO and MFA, you’ll reduce the prospect of a data breach.Check out this page for more details on the benefits of using Twingate for secure remote access.
To get started, first sign up for free account at www.twingate.com. Once you complete the sign up, just follow these steps:
1. Add a Remote Network. Add a Remote Network for the network that your Elastic server is on.
2. Deploy a Connector into that Remote Network. Click on the newly created Remote Network, then add a Connector to that network. You will be asked to authenticate yourself for security purposes. Next, click on Provision and get a command that you can use to deploy a Connector in that network. The Connector doesn’t need to be deployed to the same server on which Elastic is housed - it just needs to be deployed on a device on the same network.
3. Verify Connector Deployment. Once your Connector has been deployed, the icon for that Remote Network will have a green dot, meaning it’s hooked up to Twingate.
4. Add Elastic as a Resource. The next step is to add a Resource that represents the Elastic server (or servers). You can identify servers by individual IP addresses, a locally resolvable domain name, with CIDR notation or by using wildcards.
5. Create an Identity Provider MFA Access Policy. Now that we have our Elastic server added to Twingate, we now need to define who has access to that server and under what authentication conditions (e.g. forcing MFA checks for every access, or only once per week). These conditions are referred to as Access Policies. Access Policies are first set up in your identity provider and then tied back to Twingate. See our instructions on how to configure Okta.
6. Add that Access Policy into Twingate. Once you have set up an appropriate Access Policy in your identity provider, you can add an Access Policy into Twingate in the Settings → Identity Provider → Access Policies section.
7. Create a Group and Assign Permissions. Next, go to the Group tab and add a new Group. On this screen you can give your Group a name and associate it with the Access Policy you just created. You can also add user to the Group, and assign which Resources the Group should have access to. In this case, you would add the Elastic server resource created in step 4.
And you’re done! In our example, any user who is part of the Data Analytics group can install the Twingate client, sign in, and then be able to access the Elastic server at 10.0.0.29. When the user attempts to access that IP address, they will be prompted to authenticate using the Access Policy we assigned the Data Analytics group - in our case, MFA. Notice that we didn’t have to touch Elastic at all to secure access to it!
Try It Out
If you want to try it out for yourself, sign up for a free trial of Twingate today!
Rapidly implement a modern Zero Trust network that is more secure and maintainable than VPNs.
Solutions
The VPN replacement your workforce will love.
Solutions
Solutions