Deploying Twingate to AKS
Keith Hubner
•
•

Please note, this guide includes creating resources which will bring additional cost to your Azure subscription.
This guide assumes you have already deployed a private AKS cluster. For more information on setting this up please visit the official Microsoft Documentation.
Creating the subnet for the Twingate connector
The Twingate connector can be located wherever you like, providing it can communicate with the private Kubernetes API endpoint. For the purpose of this guide, we will be deploying a new subnet within the Kubernetes cluster vnet.
Below are the values I am using in this guide and an explanation of each one, these will probably be different in your environment.
MC_myaks-rg_myAKSCluster_uksouth
This is the name of the resource group containing all the resources for the cluster.
aks-vnet-47541802
This is the vnet which contains the aks-subnet.
TwingateConnectorSubnet
This is the name given to the new subnet used by the Twingate connector.
The values above can then be used to create the new subnet, using Azure CLI on your local machine or via cloud shell, enter the following command replacing the values as needed.
The address prefix set here is the default value, you may need to alter this depending on the subnets used in you environment.
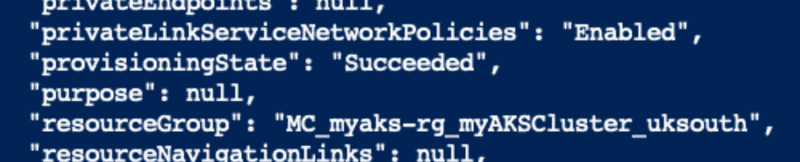
az network vnet subnet create -g MC_myaks-rg_myAKSCluster_uksouth --vnet-name aks-vnet-47541802 -n TwingateConnectorSubnet --address-prefixes 10.225.0.0/24
You should see this network successfully created:
Deploying the connector
From the Twingate admin console, open the network page of the network you created earlier.
You will see that there are two connectors already setup by default, as mentioned earlier, two connectors are recommended in production environments to ensure connectivity during connector updates or network interruptions. We will only be focussing on deploying one connector in this guide.
Creating the connector
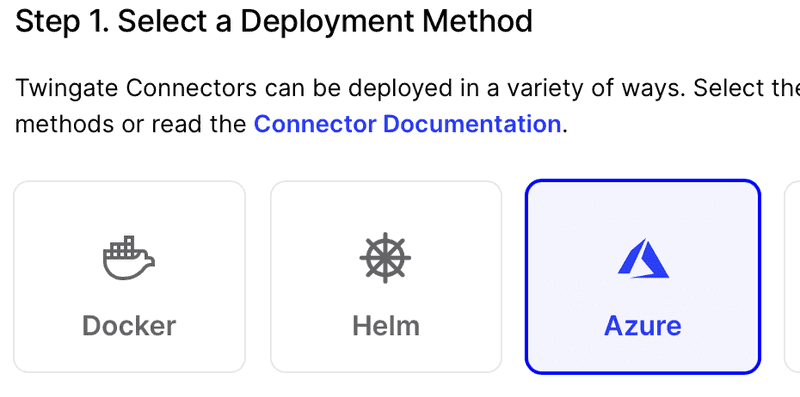
Click “Deploy Connector‚ on one of the existing connectors, or you can setup a new one by clicking the add button. Then select Azure from the deployment method:

Scroll down and click “Generate Tokens‚, this will require you to re-authenticate.

You can copy the tokens to keep in a safe place, however, as you will see below they will be included in the command we run to create the container.
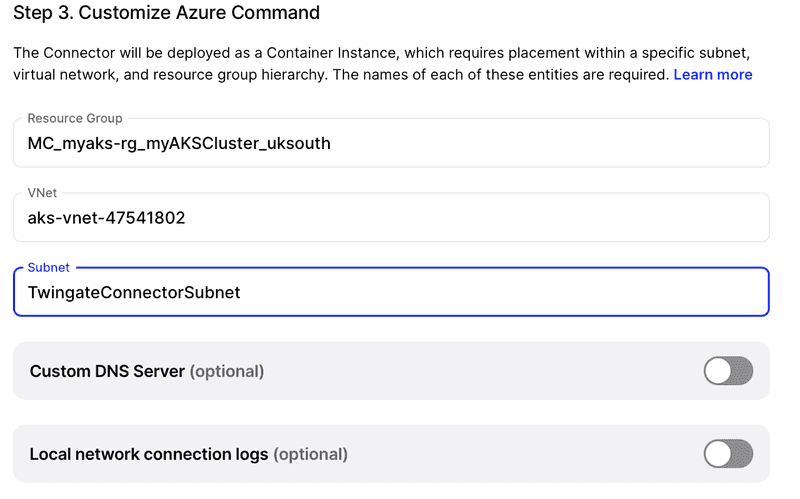
Under the “Customize Azure Command‚ section you will need to enter the details of where the container will be deployed. Below are the values used in the example above when creating the new subnet.
As mentioned above these will be unique to your environment and for the purpose of this guide we are not using a custom DNS server.
Once you have entered these values, you can copy the “Run Azure Command‚
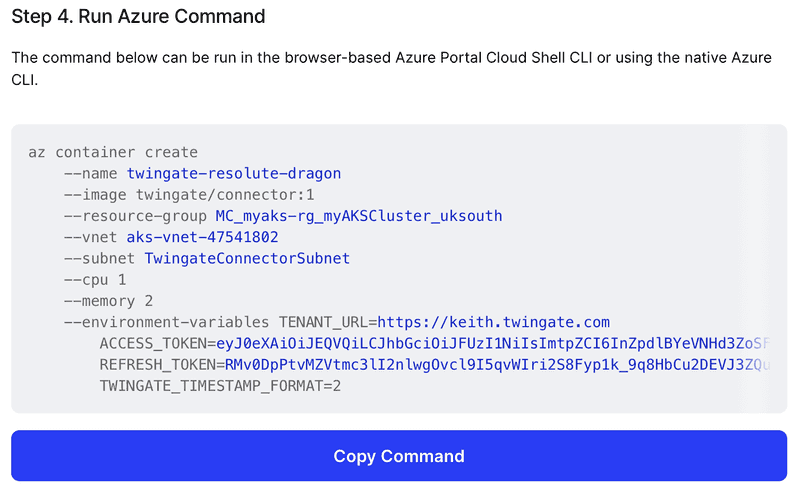
You can then paste this command into Azure CLI and run it.
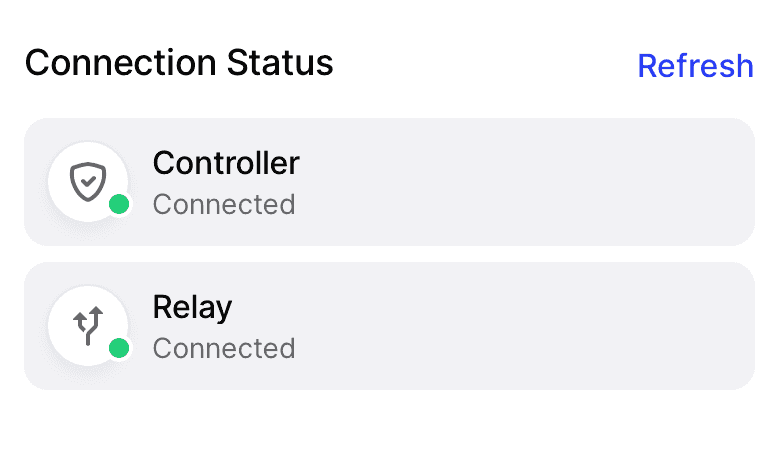
After a few moments you should see the status of the connector updated to show that Twingate can communicate with it:
Twingate resource
In order to create the resource, we will need to know the private DNS address of the Kubernetes API. You can find that by running the following Azure CLI command:
Again the name and resource group values below will vary depending on what they are named in your environment.
az aks show --name myAKSCluster --resource-group myaks-rg --query privateFqdn
This should then return the private DNS value, which looks something like this:
myaksclust-myaks-rg-2c961e-651330b5.2ae3a1be-ae4e-4214-872a-dd056332c1d8.privatelink.uksouth.azmk8s.io
Copy this value as you will need to enter it into the Twingate resource page.
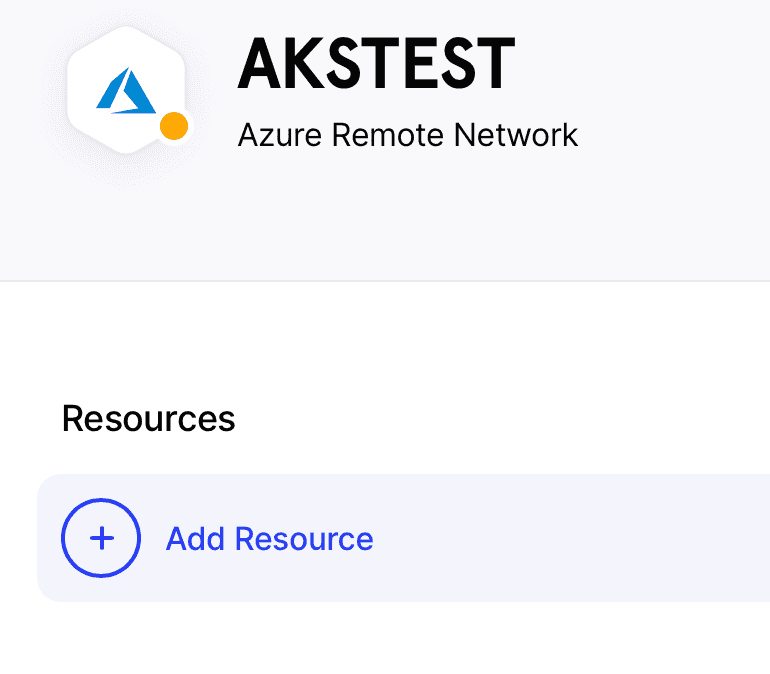
We now need to add this Kubernetes private endpoint as a resource which the connector can communicate with.
From network page you can add the new resource:
When you click on add resource you will need to enter a label (this can be anything you like), and the DNS address we copied in the previous step:

You will then be asked to assign who you want to access this resource, for the purpose of the guide I will assign everyone.

Testing your connection
First let’s check we can’t get to the cluster at the moment. Ensure your Twingate client is closed and any other VPN or private route you may be using is disabled. If you don’t have the cluster config already, you can run the following command to add the cluster config to your local KUBECONFIG file:
Again these values are based on the ones used in this guide and may vary depending on your setup.
az aks get-credentials --resource-group myaks-rg --name myAKSCluster
Now test the connection:
kubectl get nodes
Unable to connect to the server: dial tcp: lookup myaksclust-myaks-rg-2c961e-170f2ff4.77a4cdf1-ac7d-4a38-a84e-8085a94c31a9.privatelink.uksouth.azmk8s.io: no such host
Now open your Twingate client. You should also see that there is an additional authentication required, more information on this can be found in the Twingate documentation.

Follow through the authentication steps then run the same command to test the connection:
kubectl get nodes
You should now get a response from the Kubernetes API:
NAME STATUS ROLES AGE VERSION aks-nodepool1-15264394-vmss000000 Ready agent 38m v1.22.6
You now have secure access to your Kubernetes API without requiring any public access.
Rapidly implement a modern Zero Trust network that is more secure and maintainable than VPNs.
Deploying Twingate to AKS
Keith Hubner
•
•
Please note, this guide includes creating resources which will bring additional cost to your Azure subscription.
This guide assumes you have already deployed a private AKS cluster. For more information on setting this up please visit the official Microsoft Documentation.
Creating the subnet for the Twingate connector
The Twingate connector can be located wherever you like, providing it can communicate with the private Kubernetes API endpoint. For the purpose of this guide, we will be deploying a new subnet within the Kubernetes cluster vnet.
Below are the values I am using in this guide and an explanation of each one, these will probably be different in your environment.
MC_myaks-rg_myAKSCluster_uksouth
This is the name of the resource group containing all the resources for the cluster.
aks-vnet-47541802
This is the vnet which contains the aks-subnet.
TwingateConnectorSubnet
This is the name given to the new subnet used by the Twingate connector.
The values above can then be used to create the new subnet, using Azure CLI on your local machine or via cloud shell, enter the following command replacing the values as needed.
The address prefix set here is the default value, you may need to alter this depending on the subnets used in you environment.
az network vnet subnet create -g MC_myaks-rg_myAKSCluster_uksouth --vnet-name aks-vnet-47541802 -n TwingateConnectorSubnet --address-prefixes 10.225.0.0/24
You should see this network successfully created:
Deploying the connector
From the Twingate admin console, open the network page of the network you created earlier.
You will see that there are two connectors already setup by default, as mentioned earlier, two connectors are recommended in production environments to ensure connectivity during connector updates or network interruptions. We will only be focussing on deploying one connector in this guide.
Creating the connector
Click “Deploy Connector‚ on one of the existing connectors, or you can setup a new one by clicking the add button. Then select Azure from the deployment method:
Scroll down and click “Generate Tokens‚, this will require you to re-authenticate.
You can copy the tokens to keep in a safe place, however, as you will see below they will be included in the command we run to create the container.
Under the “Customize Azure Command‚ section you will need to enter the details of where the container will be deployed. Below are the values used in the example above when creating the new subnet.
As mentioned above these will be unique to your environment and for the purpose of this guide we are not using a custom DNS server.
Once you have entered these values, you can copy the “Run Azure Command‚
You can then paste this command into Azure CLI and run it.
After a few moments you should see the status of the connector updated to show that Twingate can communicate with it:
Twingate resource
In order to create the resource, we will need to know the private DNS address of the Kubernetes API. You can find that by running the following Azure CLI command:
Again the name and resource group values below will vary depending on what they are named in your environment.
az aks show --name myAKSCluster --resource-group myaks-rg --query privateFqdn
This should then return the private DNS value, which looks something like this:
myaksclust-myaks-rg-2c961e-651330b5.2ae3a1be-ae4e-4214-872a-dd056332c1d8.privatelink.uksouth.azmk8s.io
Copy this value as you will need to enter it into the Twingate resource page.
We now need to add this Kubernetes private endpoint as a resource which the connector can communicate with.
From network page you can add the new resource:
When you click on add resource you will need to enter a label (this can be anything you like), and the DNS address we copied in the previous step:
You will then be asked to assign who you want to access this resource, for the purpose of the guide I will assign everyone.
Testing your connection
First let’s check we can’t get to the cluster at the moment. Ensure your Twingate client is closed and any other VPN or private route you may be using is disabled. If you don’t have the cluster config already, you can run the following command to add the cluster config to your local KUBECONFIG file:
Again these values are based on the ones used in this guide and may vary depending on your setup.
az aks get-credentials --resource-group myaks-rg --name myAKSCluster
Now test the connection:
kubectl get nodes
Unable to connect to the server: dial tcp: lookup myaksclust-myaks-rg-2c961e-170f2ff4.77a4cdf1-ac7d-4a38-a84e-8085a94c31a9.privatelink.uksouth.azmk8s.io: no such host
Now open your Twingate client. You should also see that there is an additional authentication required, more information on this can be found in the Twingate documentation.
Follow through the authentication steps then run the same command to test the connection:
kubectl get nodes
You should now get a response from the Kubernetes API:
NAME STATUS ROLES AGE VERSION aks-nodepool1-15264394-vmss000000 Ready agent 38m v1.22.6
You now have secure access to your Kubernetes API without requiring any public access.
Rapidly implement a modern Zero Trust network that is more secure and maintainable than VPNs.
Solutions
The VPN replacement your workforce will love.
Solutions
Solutions