Simple, Secure & Free Remote Access to your Raspberry Pi + Home Assistant
Jimmy Li
•
Jan 21, 2022
If you are like us, you need a secure remote access solution for your job, and maybe you already use Twingate at work.
Also like us, you might enjoy tinkering at home with devices that you want to be able to securely access and control when you’re away. For example, if you have a Raspberry Pi, you could set up Home Assistant on it to control and automate your smart devices. But what’s the best way to access it when you are not at home?
There are some common approaches, but as the table below illustrates, they are cumbersome, insecure, and potentially expensive. We are excited to offer a new simple, secure, and free solution: Twingate Starter!
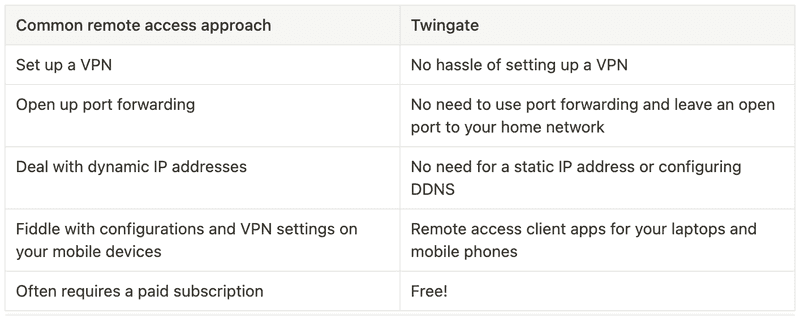
Twingate remote access does not require setting up a VPN, port forwarding, static IP addresses, or configuring DDNS
We’ve created a quick start guide below to walk you through the steps to get Twingate up and running on your Raspberry Pi. Please join us at our community forum to share and discuss your experience and projects.
Prerequisites
The rest of this guide assumes that you have a few components already installed. If not, please following these instructions first:
Twingate can be installed either as a Docker container or directly on the OS. If you prefer the first approach, please first install Docker.
Sign up for Twingate
Twingate Starter is a new free plan that is designed for home and personal use. If you don’t have an account already, please click here to sign up for a Starter account. Creating an account is simple and you can choose to sign up using a Google, Github, or other existing account you have.
Add a Connector
The Twingate Connector is a piece of software that allows for secure access to your remote network and the devices connected to it (in this case, your Raspberry Pi). For it to work, you first need to deploy the Connector on your Raspberry Pi. Click on the remote network you just created and you should see a screen like the one below with two automatically generated Connectors (the names are random) that are not yet connected.
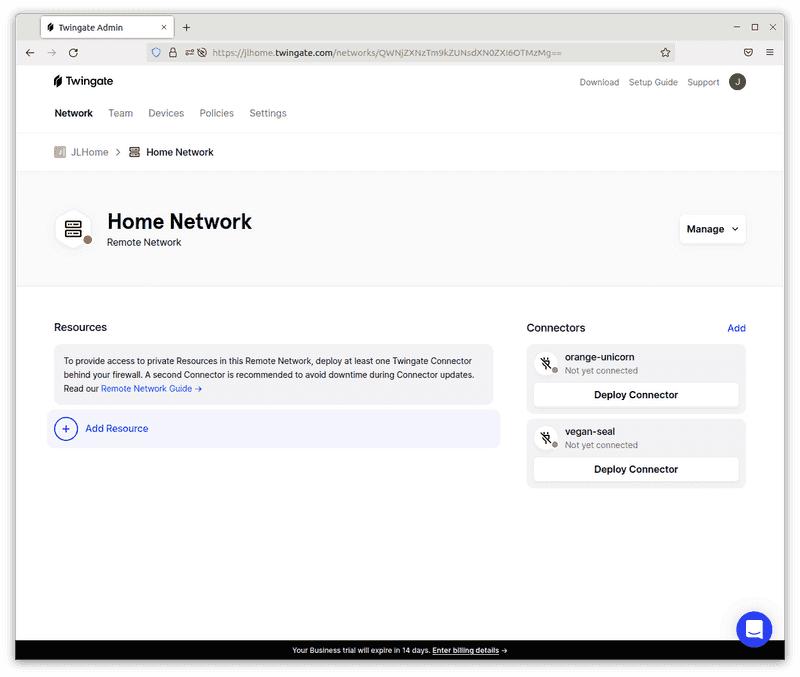
Add a Connector
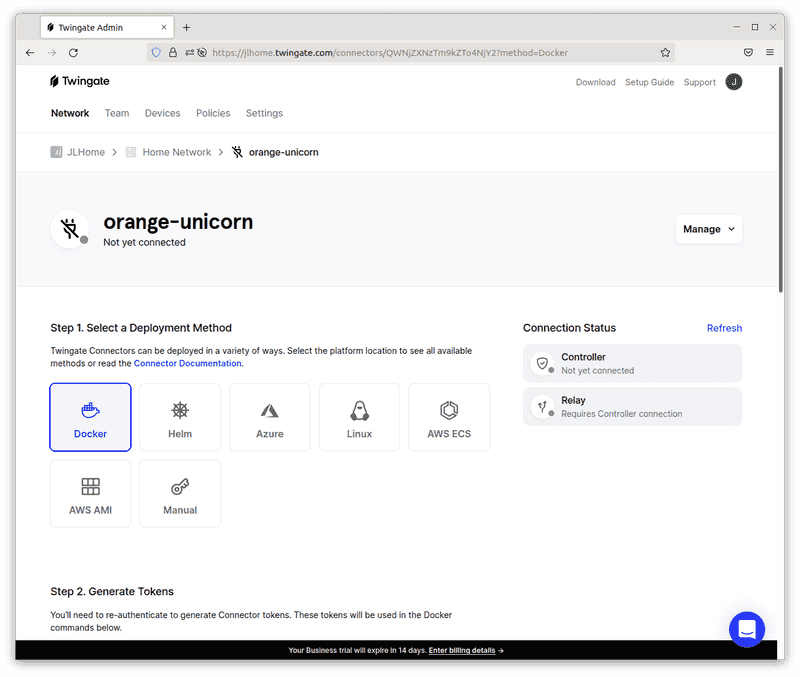
Choose one of the two Connectors and click on the “Deploy Connector‚ button. You’ll see a Controller configuration page like the one below with several deployment options. We’ll walk through the Docker method first and then also cover the Linux method further below.
Docker deployment
Add a Connector via Docker
The next step is to generate tokens for the Connector. Scroll down to Step 2 and click the “Generate Tokens‚ button. You’ll see a popup like below asking you to re-authenticate using whichever account you used to sign up (e.g., Google). After doing so, you’ll come back to this page and see that two tokens have been generated.
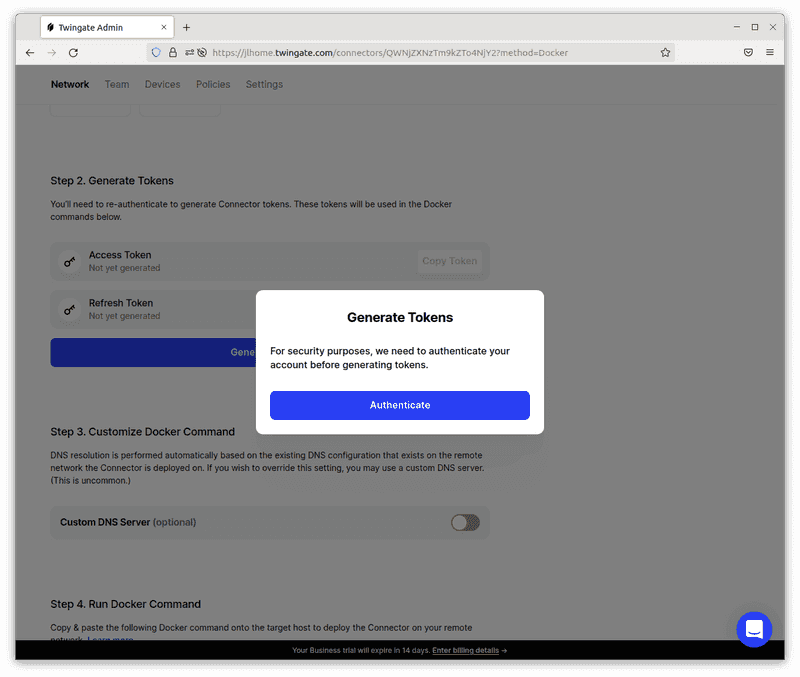
Generate tokens
Scroll down to Step 4 and copy the Docker command that has been automatically generated. Paste this into a terminal on your Raspberry Pi (you may need to add sudo at the beginning).
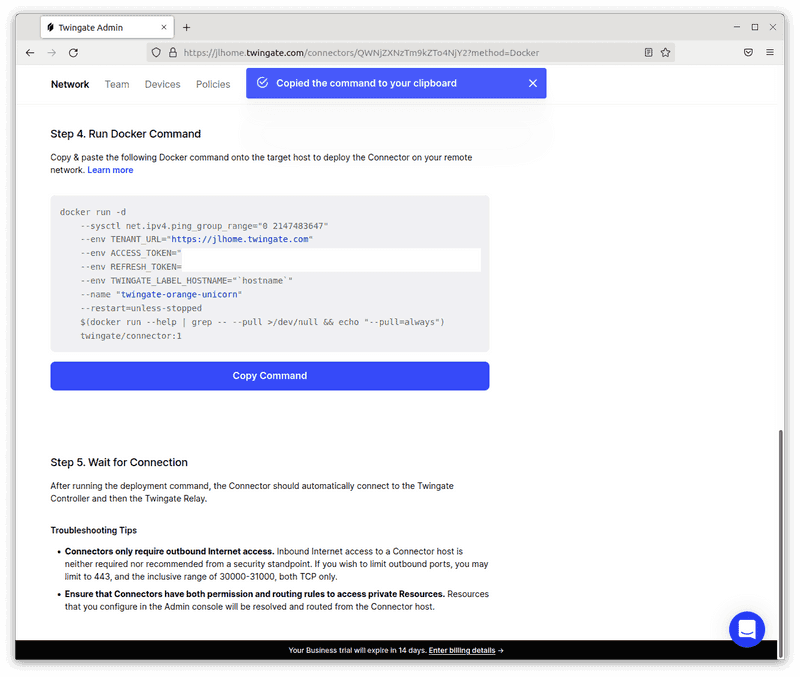
Copy command
The command should have run successfully in seconds. (You may also be asked to enter a password if you ran the command with sudo at the beginning.) You can check that the Connector is running using sudo docker ps.

Check docker ps
If you go back to the Connector configuration page, you should also see that the Connection Status has also automatically turned green. Congrats! You’ve successfully deployed your Connector.
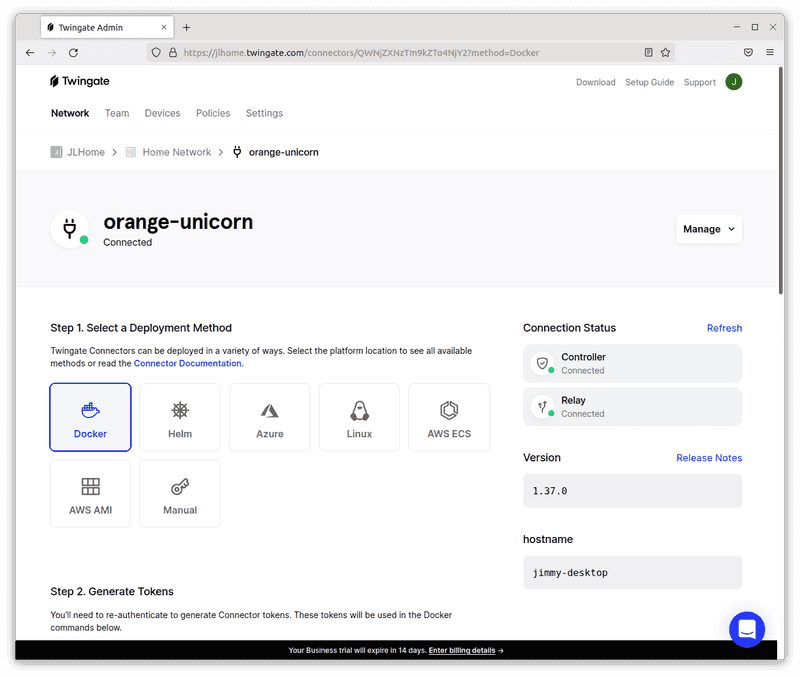
Connector is connected
Linux deployment
An alternative method is to deploy the Connector directly on the Linux OS. We support multiple distributions. Choose the other automatically generated Connector and click the “Linux‚ box under Step 1.
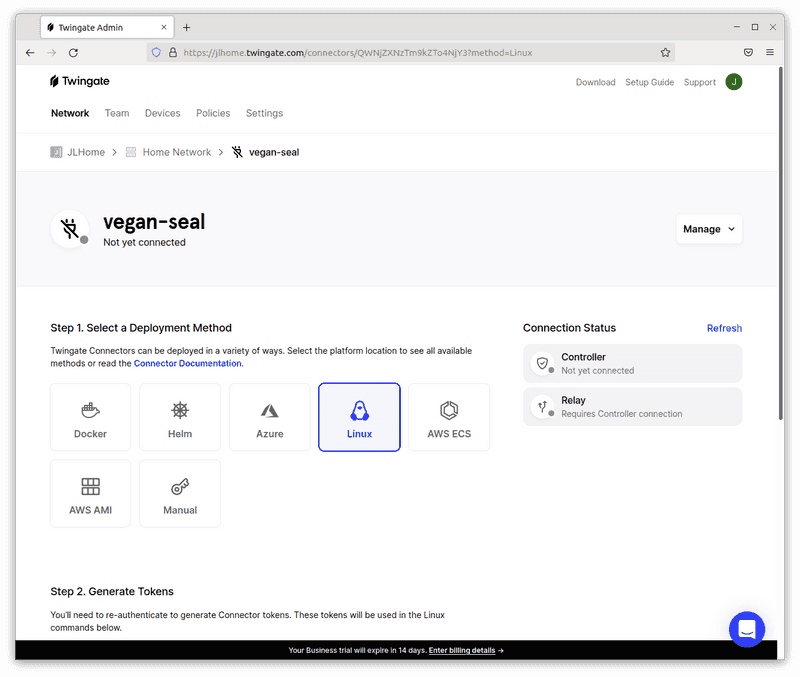
Add a Connector via Linux
Just like with the Docker method, you’ll need to generate tokens for Step 2. This will also prompt you to authenticate again using the account you used to sign up.
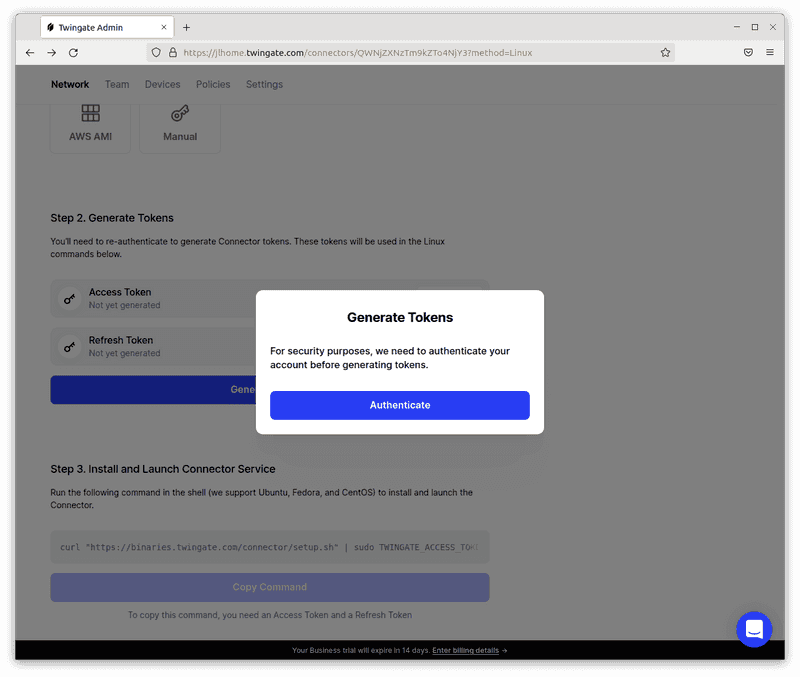
Generate tokens
After authenticating, you’ll see two tokens were generated and a command was automatically generated under Step 3. Click the button to copy the command and run it in a shell terminal.
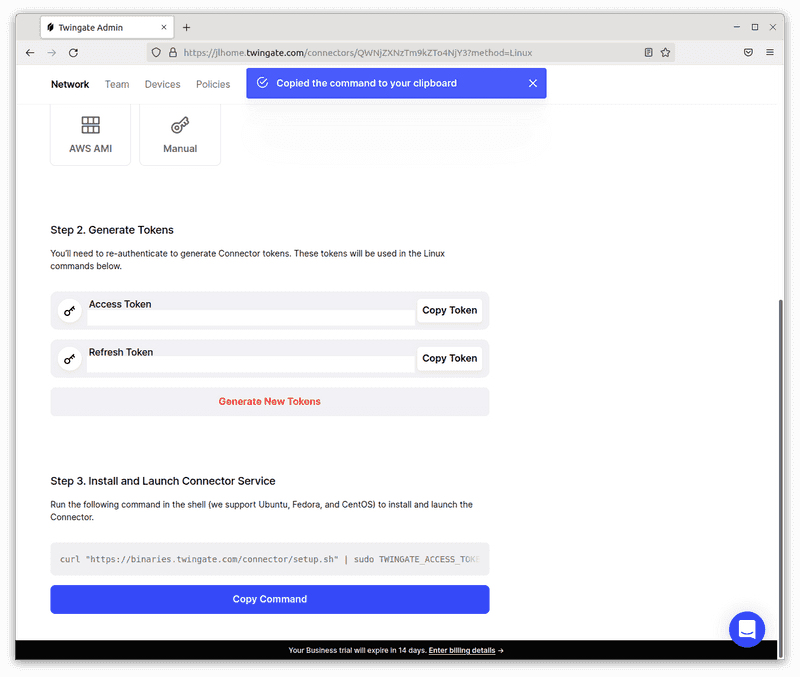
Copy command
The command should take a couple minutes to run, after which you should see that the Connector’s status has automatically turned green on the Twingate web portal.
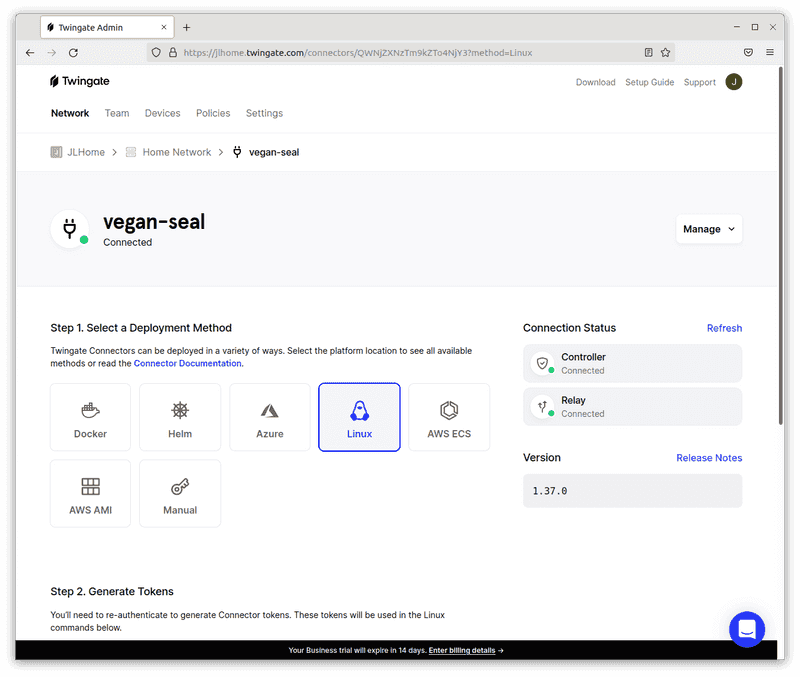
Connector is connected
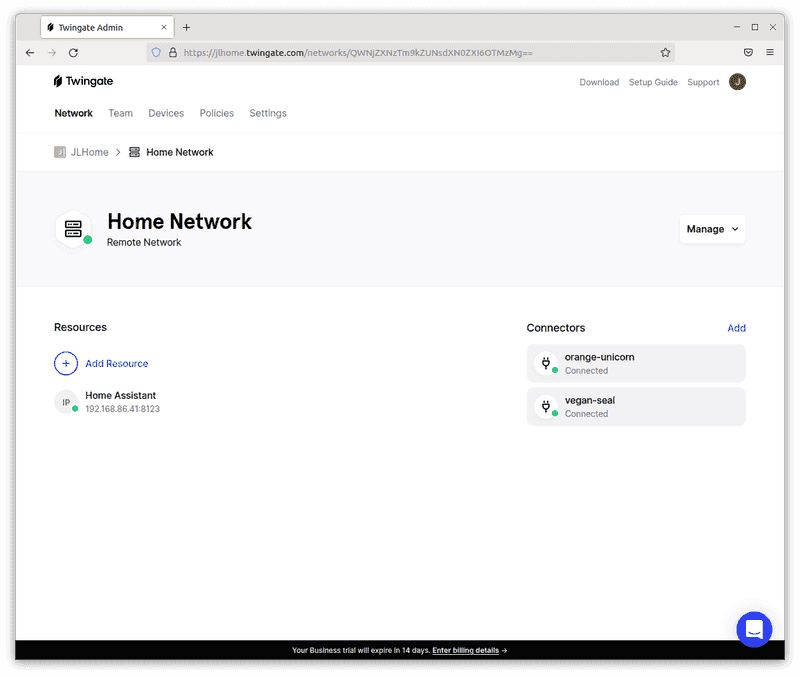
Add a Resource
You’ve now set up a Connector on your Raspberry Pi. This Connector enables remote access for any device or service on your home network (called a “Resource‚ in Twingate). For now, we’re just interested in enabling access to the Home Assistant service on the Raspberry Pi, so we need to add it as a Resource.
Go back to your Remote Network and click on the “Add Resource‚ link. You’ll see a popup like the one below. Click on the “CIDR Address‚ box, choose a Label name for the Resource, enter the local IP address of Home Assistant (likely something like 192.168.xxx.xxx), choose 8123 for the Port Restriction, and click “Add Resource‚.
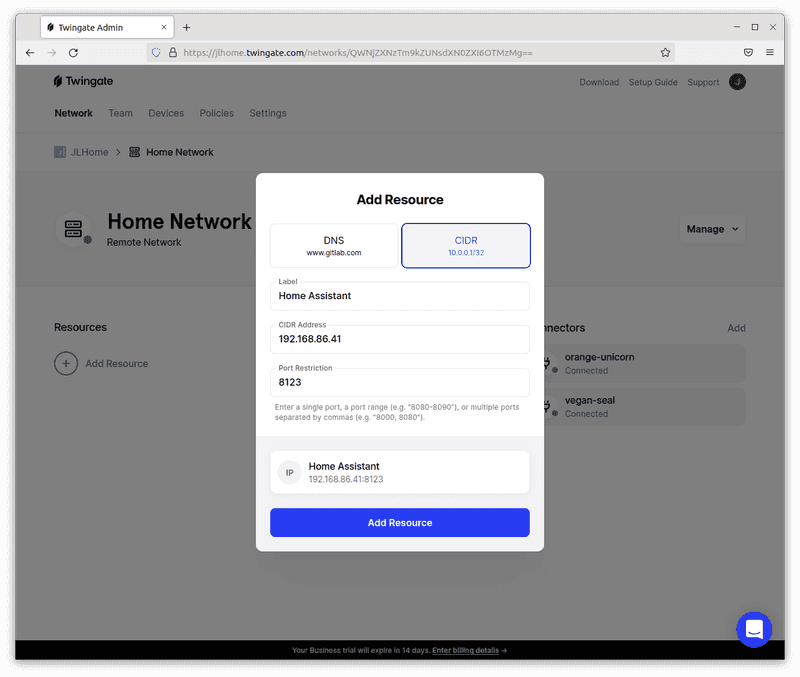
Add a Resource
Congrats! Your Home Assistant is now enabled for secure remote access!
Setup is complete
Set up the Twingate client
All that’s left to do now is to install Twingate on your device (we support Windows, Mac, Linux and have apps for iOS and Android) and access your Raspberry Pi + Home Assistant. As an example, let’s walk through setting up the Twingate client on iOS.
First, download and install the iOS app here. Type in the Network URL that you chose when you signed up and tap “Join Network‚. You’ll be automatically asked to log in using the same account you used to sign up. After signing in, you’ll land on the home screen, where you should already see your Home Assistant Resource listed. When you are connected to your Twingate network, a “VPN‚ icon will appear in the top bar of your screen.
To test it out, stay connected to Twingate, disconnect from your local network (e.g., by disabling WiFi), and navigate to your Home Assistant instance on your phone’s browser. You should be able to access it just as if you were at home.
Finally, disconnect from Twingate and try accessing Home Assistant again — you should see that it’s inaccessible.
Congrats! You’ve finished setting up Twingate for Raspberry Pi + Home Assistant. Join us in the community forum to share how things went and what cool integrations you’ve set up!

Client setup
Sharing is Caring
Do you want to share access with a family member? You can easily do this from the Twingate web UI. Just go to the Team tab and click “Invite User‚ to send an email invitation. The recipient would simply follow the same steps to download the Twingate client, join your network, and get access to Home Assistant, or any other resource you set up!
Invite other users
Rapidly implement a modern Zero Trust network that is more secure and maintainable than VPNs.
Simple, Secure & Free Remote Access to your Raspberry Pi + Home Assistant
Jimmy Li
•
Jan 21, 2022
If you are like us, you need a secure remote access solution for your job, and maybe you already use Twingate at work.
Also like us, you might enjoy tinkering at home with devices that you want to be able to securely access and control when you’re away. For example, if you have a Raspberry Pi, you could set up Home Assistant on it to control and automate your smart devices. But what’s the best way to access it when you are not at home?
There are some common approaches, but as the table below illustrates, they are cumbersome, insecure, and potentially expensive. We are excited to offer a new simple, secure, and free solution: Twingate Starter!
Twingate remote access does not require setting up a VPN, port forwarding, static IP addresses, or configuring DDNS
We’ve created a quick start guide below to walk you through the steps to get Twingate up and running on your Raspberry Pi. Please join us at our community forum to share and discuss your experience and projects.
Prerequisites
The rest of this guide assumes that you have a few components already installed. If not, please following these instructions first:
Twingate can be installed either as a Docker container or directly on the OS. If you prefer the first approach, please first install Docker.
Sign up for Twingate
Twingate Starter is a new free plan that is designed for home and personal use. If you don’t have an account already, please click here to sign up for a Starter account. Creating an account is simple and you can choose to sign up using a Google, Github, or other existing account you have.
Add a Connector
The Twingate Connector is a piece of software that allows for secure access to your remote network and the devices connected to it (in this case, your Raspberry Pi). For it to work, you first need to deploy the Connector on your Raspberry Pi. Click on the remote network you just created and you should see a screen like the one below with two automatically generated Connectors (the names are random) that are not yet connected.
Add a Connector
Choose one of the two Connectors and click on the “Deploy Connector‚ button. You’ll see a Controller configuration page like the one below with several deployment options. We’ll walk through the Docker method first and then also cover the Linux method further below.
Docker deployment
Add a Connector via Docker
The next step is to generate tokens for the Connector. Scroll down to Step 2 and click the “Generate Tokens‚ button. You’ll see a popup like below asking you to re-authenticate using whichever account you used to sign up (e.g., Google). After doing so, you’ll come back to this page and see that two tokens have been generated.
Generate tokens
Scroll down to Step 4 and copy the Docker command that has been automatically generated. Paste this into a terminal on your Raspberry Pi (you may need to add sudo at the beginning).
Copy command
The command should have run successfully in seconds. (You may also be asked to enter a password if you ran the command with sudo at the beginning.) You can check that the Connector is running using sudo docker ps.
Check docker ps
If you go back to the Connector configuration page, you should also see that the Connection Status has also automatically turned green. Congrats! You’ve successfully deployed your Connector.
Connector is connected
Linux deployment
An alternative method is to deploy the Connector directly on the Linux OS. We support multiple distributions. Choose the other automatically generated Connector and click the “Linux‚ box under Step 1.
Add a Connector via Linux
Just like with the Docker method, you’ll need to generate tokens for Step 2. This will also prompt you to authenticate again using the account you used to sign up.
Generate tokens
After authenticating, you’ll see two tokens were generated and a command was automatically generated under Step 3. Click the button to copy the command and run it in a shell terminal.
Copy command
The command should take a couple minutes to run, after which you should see that the Connector’s status has automatically turned green on the Twingate web portal.
Connector is connected
Add a Resource
You’ve now set up a Connector on your Raspberry Pi. This Connector enables remote access for any device or service on your home network (called a “Resource‚ in Twingate). For now, we’re just interested in enabling access to the Home Assistant service on the Raspberry Pi, so we need to add it as a Resource.
Go back to your Remote Network and click on the “Add Resource‚ link. You’ll see a popup like the one below. Click on the “CIDR Address‚ box, choose a Label name for the Resource, enter the local IP address of Home Assistant (likely something like 192.168.xxx.xxx), choose 8123 for the Port Restriction, and click “Add Resource‚.
Add a Resource
Congrats! Your Home Assistant is now enabled for secure remote access!
Setup is complete
Set up the Twingate client
All that’s left to do now is to install Twingate on your device (we support Windows, Mac, Linux and have apps for iOS and Android) and access your Raspberry Pi + Home Assistant. As an example, let’s walk through setting up the Twingate client on iOS.
First, download and install the iOS app here. Type in the Network URL that you chose when you signed up and tap “Join Network‚. You’ll be automatically asked to log in using the same account you used to sign up. After signing in, you’ll land on the home screen, where you should already see your Home Assistant Resource listed. When you are connected to your Twingate network, a “VPN‚ icon will appear in the top bar of your screen.
To test it out, stay connected to Twingate, disconnect from your local network (e.g., by disabling WiFi), and navigate to your Home Assistant instance on your phone’s browser. You should be able to access it just as if you were at home.
Finally, disconnect from Twingate and try accessing Home Assistant again — you should see that it’s inaccessible.
Congrats! You’ve finished setting up Twingate for Raspberry Pi + Home Assistant. Join us in the community forum to share how things went and what cool integrations you’ve set up!
Client setup
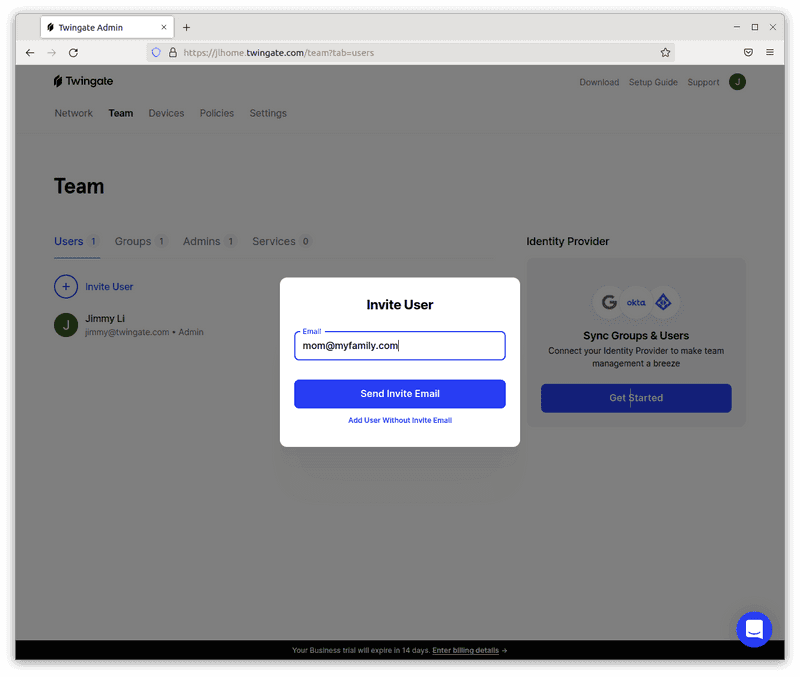
Sharing is Caring
Do you want to share access with a family member? You can easily do this from the Twingate web UI. Just go to the Team tab and click “Invite User‚ to send an email invitation. The recipient would simply follow the same steps to download the Twingate client, join your network, and get access to Home Assistant, or any other resource you set up!
Invite other users
Solutions
Solutions
The VPN replacement your workforce will love.
Solutions